Evan's boat projects: floor replacement

Evan B

Bobber Downey Jr.
Staff member
Admin
Surprised at the number of people hitting me up to ask how progress was going. I didn't think this project was THAT interesting 😂 y'all got the shack nasties.

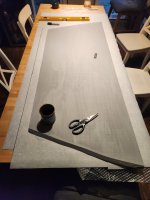
I have slowly been chipping away at it. Since I don't have a shop to do the work and the garage is a bit too full of stuff that I'm too lazy to move... Been having to budget my time during the nicer days to get the primer on the floor sheets I have cut. Well that's done, so next is actually getting them in the boat and riveted down. I could really do that whenever, but I'm more wanting to find a nice week or so that way I can also roll on the deck tread paint while I'm at it.

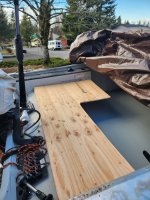
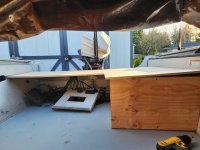
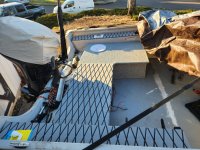
Today I got my diamond plate front platform all finished up, support beam riveted in, and the wooden platform that sits behind it which connects to it with hinges. That piece lifts up to access the storage area that will be there. There will also be a vertical piece that supports it and completes the wall of the box, but want to wait for the floor to be in to make sure the measurements are all good.
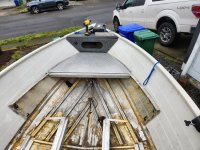
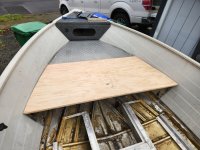
1000004152.jpg
1000004153.jpg
 

Evan B

Bobber Downey Jr.
Staff member
Admin
Weather is still too crappy to do anything outside so I'm going to do some upholstery.

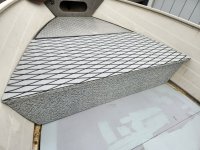
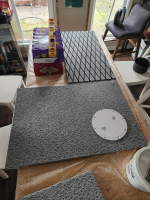
This piece here is the one seen in the above post. It's the front deck platform that doubles as a hatch to the front storage area.

Goal is to cover it with the Eva foam decking I got, but that doesn't take care of the edges. So I'm cutting strips of marine vinyl to wrap the edges and ends for both waterproofing and aesthetics.

1000004730.jpg
 

Evan B

Bobber Downey Jr.
Staff member
Admin
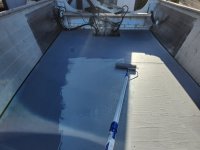
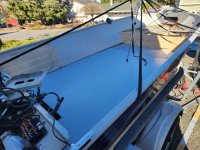
So yesterday I was ambitious given the short window of temps / sun I had to work with, but since it's not the final coat, I wasn't too worried.

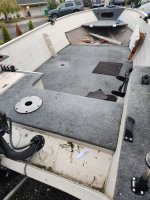
  • Riveted down the floor pieces
  • Laid down another thick layer of primer to fill in the gaps and seal up the rivets a bit.
  • Put on one of at least two coats of deck tread paint
1000004844.jpg
Here it is before I put the cover on (forecasted to be soggy again this week). I plan to sand down a few areas where the primer made things kinda ugly before the next coat goes on. Might also put in a few more rivets. (the area toward the bow next to the front deck/storage without deck paint is going to have eva flooring on it like shown on the front platform piece below).

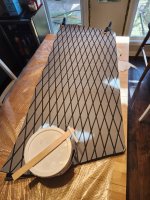
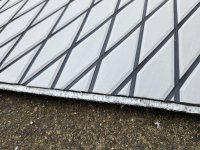
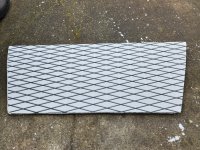
Here is the front hatch / platform piece as it currently sits on my table with the eva deck material all trimmed up. Trying to let it relax a bit before I apply it. It has a sticky backside that is likely sufficient, but I'm going to also spray the hatch side with high strength spray-on adhesive as added insurance.

1000004845.jpg
 

Evan B

Bobber Downey Jr.
Staff member
Admin
Note about the EVA flooring:

Got it all on and bonded. I had trimmed it about a quarter inch overhanging the edges so that I could get it all bonded on there and use a fresh razor blade to trim it flush. Well, turns out that it's stretched a bit on the backing paper that protects the sticky side. So when you pull the backing off, the sheet relaxes. I lost about 3/4" on the long side to this.

So went from overhanging a quarter inch to it showing some of the edge. Not the end of the world since I put vinyl around the edges to help make the sides look nice. But something to keep in mind for anyone planning to use the stuff in their boats. ( @rooftop @Buzzy )
 
Last edited:

Evan B

Bobber Downey Jr.
Staff member
Admin
More on the Eva decking. Finally took a few pics of it.

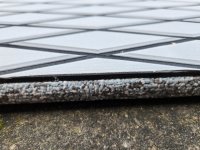
I quite like how it came out. Other than it shrinking a bit after pulling the backing off, I'd say it was a solid first attempt.

The one issue though is the port and starboard edges were cut wit scissors and not a razor, so they're a bit jagged. The plan was to not have those as the final edge. I was going to trim them flush after it was all bonded. But once it shrunk a bit, it went too far inside the edge to fix.
1000004865.jpg

As for the wonky sides I didn't get to finish the way I intended, the bright side is they won't be totally noticeable once installed.
1000004863.jpg
I was somewhat concerned about the look of the edges from a side view thinking they'd need some type of additional edging to tie together. It actually looks totally fine as is.
1000004864.jpg

Have a few more sections of it that I'll be installing in other parts of the boat. I've also just started wrapping the remaining panel pieces with marine vinyl. Hope to have most those done by this weekend.
 

Evan B

Bobber Downey Jr.
Staff member
Admin
Cutting the final pieces. These are for the rear deck where I sit and or stand, depending on the situation. The switch panel goes underneath as well as my new gas tank (port side). The underneath pieces are a little trickier to get right than I anticipated, but once these are done, I'm nearing completion :D


1000004878.jpg


1000004879.jpg
 

Hobbyranch

Steelhead
Forum Supporter
Heck of a
Cutting the final pieces. These are for the rear deck where I sit and or stand, depending on the situation. The switch panel goes underneath as well as my new gas tank (port side). The underneath pieces are a little trickier to get right than I anticipated, but once these are done, I'm nearing completion :D


View attachment 102484


View attachment 102485
n upgrade z!
Cutting the final pieces. These are for the rear deck where I sit and or stand, depending on the situation. The switch panel goes underneath as well as my new gas tank (port side). The underneath pieces are a little trickier to get right than I anticipated, but once these are done, I'm nearing completion :D


View attachment 102484


View attachment 102485
this is turning out great Evan
 

Evan B

Bobber Downey Jr.
Staff member
Admin
While I'll need nicer weather to finish the floor around it, the front deck area is gettin closer.
1000004893.jpg

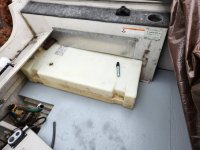
Also working on getting the fuel tank put in. Got tired of refilling the little 6gal portable tank every trip so putting a 17gal one in 🥳. Had to cut the side panel to fit it. (it will be underneath the rear deck panel)

1000004891.jpg
 

wanderingrichard

Life of the Party
While I'll need nicer weather to finish the floor around it, the front deck area is gettin closer.
View attachment 102724

Also working on getting the fuel tank put in. Got tired of refilling the little 6gal portable tank every trip so putting a 17gal one in 🥳. Had to cut the side panel to fit it. (it will be underneath the rear deck panel)

View attachment 102725
Evan, how's your balance and center of gravity after doing these mods ???
 

Evan B

Bobber Downey Jr.
Staff member
Admin
Evan, how's your balance and center of gravity after doing these mods ???
Nothing I'm doing is changing that much honestly. The only major mod is the gas tank where the live well used to be. Otherwise the weight distribution isn't going to change much from what was there before. I mostly just upgraded materials.
 

Evan B

Bobber Downey Jr.
Staff member
Admin
And today I am vinyl wrapping my final major piece which is the deck that goes along the rear of the boat. This is where I sit when running the tiller while trolling, and it can also serve as a rear casting platform.

Covering the top and bottom both to help waterproof it since I'm out of primer. The starboard side where I operate the boat is going to have the eva foam decking.

Once this is done, I'm in the home stretch 🥳

1000004921.jpg
(proper weights for drying glue)
 

Evan B

Bobber Downey Jr.
Staff member
Admin
Really happy with how this panel came out. And with this (and the two small panels that support it), my vinyl wrapping is complete. Now it's just a matter of getting everything installed and main floor painted with one more coat.

1707745300241.png
 

SurfnFish

Legend
Forum Supporter
looking really good..like the EVA on the rear gunnel flotation chembers, good place to lay pliers or clipped fly, and never know when your feet going to land there stepping in dockside.
 

Evan B

Bobber Downey Jr.
Staff member
Admin
looking really good..like the EVA on the rear gunnel flotation chembers, good place to lay pliers or clipped fly, and never know when your feet going to land there stepping in dockside.
Yeah it was carpeted plywood there before. I actually tried cutting new pieces of plywood to put there to wrap with vinyl, but don't have a table saw or guide rail, so they weren't straight enough for my liking. Eventually decided I really didn't need wood there and to save myself the further trouble. I do mount rod holders on there, so am cutting some HDPE plastic to reinforce those mounts, but otherwise it'll just be that EVA.
 
Top