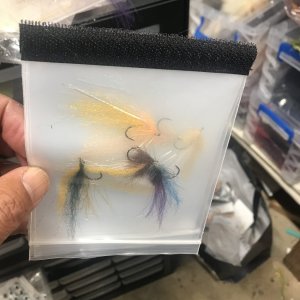
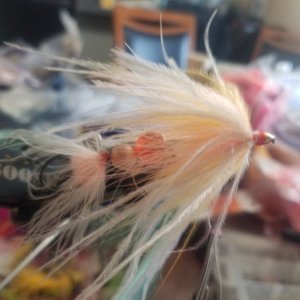
This particular fly has caught over 60 largemouth over the course of the last couple of years and is still ticking. I did recently replace one of the eyes and the week guard pulled loose on my last trip and had to be repaired. In general however deer flies are very tough and last a long time when constucted with durability in mind.
They are effective and not that hard to tie.
 Here are some hints about making tough effective deer hair bass flies. This is a swimming frog which is my favorite, but other than head/body shape a popper would be made in the same way.

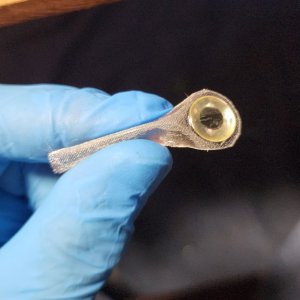
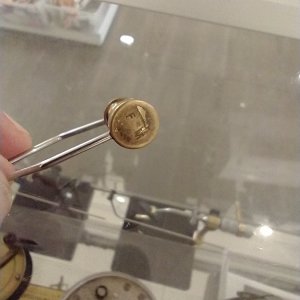
This hook is a Ahrex predator stinger. The same hook Billy has said he uses for foam poppers. This hook is very similar to the TMC 8089#2 and B10S are also much the same and good for these flies. This shows the installation of the weed guard. The front of the weed guard serves as a bump which helps to prevents any sliding of other materials. I like to coat the thread back here with some sort of UV finish or glue to prevent damage from bass teeth.
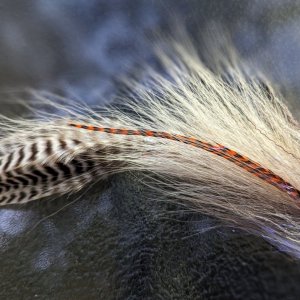
Next comes a smallish bunch of some material to help the tail stay spread. In this case I used grizzly bird fur, but bucktail, craft fur or simialr works fine. Marabou is a poor choice for use in deer hair bugs as it is fragile enough to shorten the useful life of the fly.
Select six hackle feathers three from each side of the neck and put them all in a bunch and trim to length. Should be around 1-1/2 tmes body length. Trim the fiber off of the hackles as shown below instead of stripping the fibers. This prevents them from pulling out over time.

Tie in the tail with three feathers on each side splayed outward. These will kick during retrieve. A little head cement at the tie in point of the tail is useful.
Another rooster feather wrapped in as a collar. This helps keep the deer hair body from affecting the positioning of the tail (hind legs).

The next steps apply to all deer hair stacking. Tie in the belly hair on top of the hook with three progressively tighter wraps. The third wrap will pull the hair to the bottom of the shank. Be sure to pull straight down on the tight final wrap.

Tie in the top layer of hair in the exact same location on tip of the shank. Tighten hard by pulling straight down. Advance the thread forward, Take a few wraps on the shank, throw a half hitch and then pack the hair backwards with whatever tool you have for this. The fingers work just fine if that is what you have. I like some softex or flexament in front of each stack for durability.

Continue stacking hair until you fill the shank. Multipe colors can be stacked as shown below. It is important that the amount of the hair on the bottom of the shank is equal to that on the top. So if using three colors I go something like 50%, 25%, 25% of the bottom hair.


Trimming the fly- Start with the bottom. Trim it flat but not to close to the shank. It is important to balance the weight on top and bottom of the fly so that it doesn't land on it's back all of the time.

Trim the rest of the fly to taste. I generally go wrong if not patient enough. You can't put hair back on, but can always cut more off.

At this point the top of the fly is sort of tall and needs to be trimmed shorter for proper fishing. The taper in the back removes hair from the top and helps the fly make a nice bloop sound when retrieved.

Trim the weed guard to size. Flatten the very end of the weed guard. This bump helps it stay in place. Tie in the weed guard at the front of the fly. Superglue is useful here.

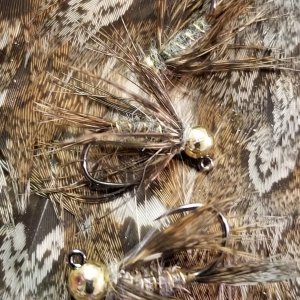
Install the front legs using a needle pushed through the body. If the body is tight this shouldn't pull out, but some softex or flexament on the legs near the body and then pulled into the body really locks them in Completed fly, front view.

Side view
They are effective and not that hard to tie.
Here are some hints about making tough effective deer hair bass flies. This is a swimming frog which is my favorite, but other than head/body shape a popper would be made in the same way.This hook is a Ahrex predator stinger. The same hook Billy has said he uses for foam poppers. This hook is very similar to the TMC 8089#2 and B10S are also much the same and good for these flies. This shows the installation of the weed guard. The front of the weed guard serves as a bump which helps to prevents any sliding of other materials. I like to coat the thread back here with some sort of UV finish or glue to prevent damage from bass teeth.
Next comes a smallish bunch of some material to help the tail stay spread. In this case I used grizzly bird fur, but bucktail, craft fur or simialr works fine. Marabou is a poor choice for use in deer hair bugs as it is fragile enough to shorten the useful life of the fly.
Select six hackle feathers three from each side of the neck and put them all in a bunch and trim to length. Should be around 1-1/2 tmes body length. Trim the fiber off of the hackles as shown below instead of stripping the fibers. This prevents them from pulling out over time.
Tie in the tail with three feathers on each side splayed outward. These will kick during retrieve. A little head cement at the tie in point of the tail is useful.
Another rooster feather wrapped in as a collar. This helps keep the deer hair body from affecting the positioning of the tail (hind legs).
The next steps apply to all deer hair stacking. Tie in the belly hair on top of the hook with three progressively tighter wraps. The third wrap will pull the hair to the bottom of the shank. Be sure to pull straight down on the tight final wrap.
Tie in the top layer of hair in the exact same location on tip of the shank. Tighten hard by pulling straight down. Advance the thread forward, Take a few wraps on the shank, throw a half hitch and then pack the hair backwards with whatever tool you have for this. The fingers work just fine if that is what you have. I like some softex or flexament in front of each stack for durability.
Continue stacking hair until you fill the shank. Multipe colors can be stacked as shown below. It is important that the amount of the hair on the bottom of the shank is equal to that on the top. So if using three colors I go something like 50%, 25%, 25% of the bottom hair.
Trimming the fly- Start with the bottom. Trim it flat but not to close to the shank. It is important to balance the weight on top and bottom of the fly so that it doesn't land on it's back all of the time.
Trim the rest of the fly to taste. I generally go wrong if not patient enough. You can't put hair back on, but can always cut more off.
At this point the top of the fly is sort of tall and needs to be trimmed shorter for proper fishing. The taper in the back removes hair from the top and helps the fly make a nice bloop sound when retrieved.
Trim the weed guard to size. Flatten the very end of the weed guard. This bump helps it stay in place. Tie in the weed guard at the front of the fly. Superglue is useful here.
Install the front legs using a needle pushed through the body. If the body is tight this shouldn't pull out, but some softex or flexament on the legs near the body and then pulled into the body really locks them in
Completed fly, front view.Side view
Last edited: