Navigation
Install the app
How to install the app on iOS
Follow along with the video below to see how to install our site as a web app on your home screen.
Note: This feature may not be available in some browsers.
More options
Style variation
You are using an out of date browser. It may not display this or other websites correctly.
You should upgrade or use an alternative browser.
You should upgrade or use an alternative browser.
What have you done for your boat lately?
- Thread starter _WW_
- Start date


great refresh on a classic!Warning long post ahead.
Just buttoned up the spring projects on the whaler. As usual, what started as a couple small projects turned into just about a full interior refresh. I also did a poor job of before and during photos.
The first thing I wanted to accomplish was relocating the battery to under the center console like they started doing in the early 90s on the Montauk. This is the best before pic I have, but on the classic whalers the batteries were mounted to the deck of the boat taking up valuable real estate.
View attachment 120729
The battery relocation turned into a full rewire. New longer 2 gauge battery cables to the new battery in the console, all new wiring/battery switch/breaker/fuse panel in the console, new horn, new usb ports, new bilge pump and wiring, new waterproof junction box in the rear for the navigation lights. Not the prettiest under the console, but everything is at least tucked out of the way and should allow for storage without things getting hung up on wiring. The floor of the console I cut out for the battery box to rest on the deck of the boat on a piece of dri-dek, similar to what they switched to in the early 90s. While I was working on the console I cleared off the top except for the Garmin and cupholder and cut out a section of EVA boat decking to cover all the leftover holes.
View attachment 120730
View attachment 120737
The fuel tank mounted under the seat didn't sit quite right between some strips of wood that attached to the deck, and the tank itself was laying right on the deck of the boat. I removed the seat and mounting strips and found this under the tank:
View attachment 120731
It was some sort of slimy concoction of dirt/grime/water/who knows what else, but it cleaned up well, and I filled the old mounting holes with epoxy and resecured the fuel tank with new mounting straps to sit on dri-dek so that water can flow under the tank. While I had the seat out I also refinished the seat legs that were sun faded, because why not?
View attachment 120732
The biggest project besides the wiring was the teak. I decided to remove every piece of teak from the boat and sand everything down. After some reading instead of finishing with teak oil I ended up using Semco Teak Sealer. It was super easy to apply and the upkeep should be fairly straight forward hopefully. It doesn't shine like oil or varnish nor does it really affect the color of the teak itself, it just looks like clean teak and now the water beads right off. Console doors got all new stainless hinges and cabinet locks. In front of the console there are what are supposed to be two mahogany cooler chocks attached to the floor. Upon removal to refinish, one was rotted out and was not mahogany. I contemplated making new chocks from scratch, but ended up buying replacement chocks from Boston Whaler that were used on the 90s boats that are made of of starboard.
View attachment 120733
View attachment 120734
View attachment 120735
View attachment 120736
All in all, it's still a 38 year old boat with some minor bumps and bruises to show for it, but I'm pretty damn happy with how it turned out. Now I'm afraid to get it dirty.

If you are older and have bad knees or balance, center console is the way to go.It's a long story. The short version is my thinking then (in retrospect now clearly skewed) was to design it for twins. I still have a pair of "new" 2005 Merc 25hp 2-strokes still in crates. I could probably sell those and hang a single 50+ 4 stroke with tiller, but it would look weird on the transom. If I drew it up now, I'm sure I'd go that route. So kinda committed to the original concept.
Edit: This is basically an upscaled version of the plywood skiffs my Dad designed in the 50's and 60's. They were awesome boats that saw action from the North Sound, both sides of VI, coastal bays, the Columbia, and even Buoy 10. We caught a lot of fish, and managed to stay out of trouble beyond what the cantankerous Gale and Evinrude outboards threw at us. Which might explain why he had a thing for outboard wells. Something he apparently passed on to me. Anyway, my thoughts with this boat was a compromise "well" with the forward set transom. Not saying it's the greatest idea, but I'd basically have to gut and completely rebuild the entire aft section.
I'm open to suggestions, but here's the basic design:
View attachment 120370
View attachment 120371
View attachment 120372

Book marking this for reference when I finally get around to finishing mine as a CC.Warning long post ahead.
Just buttoned up the spring projects on the whaler. As usual, what started as a couple small projects turned into just about a full interior refresh. I also did a poor job of before and during photos.
The first thing I wanted to accomplish was relocating the battery to under the center console like they started doing in the early 90s on the Montauk. This is the best before pic I have, but on the classic whalers the batteries were mounted to the deck of the boat taking up valuable real estate.
View attachment 120729
The battery relocation turned into a full rewire. New longer 2 gauge battery cables to the new battery in the console, all new wiring/battery switch/breaker/fuse panel in the console, new horn, new usb ports, new bilge pump and wiring, new waterproof junction box in the rear for the navigation lights. Not the prettiest under the console, but everything is at least tucked out of the way and should allow for storage without things getting hung up on wiring. The floor of the console I cut out for the battery box to rest on the deck of the boat on a piece of dri-dek, similar to what they switched to in the early 90s. While I was working on the console I cleared off the top except for the Garmin and cupholder and cut out a section of EVA boat decking to cover all the leftover holes.
View attachment 120730
View attachment 120737
The fuel tank mounted under the seat didn't sit quite right between some strips of wood that attached to the deck, and the tank itself was laying right on the deck of the boat. I removed the seat and mounting strips and found this under the tank:
View attachment 120731
It was some sort of slimy concoction of dirt/grime/water/who knows what else, but it cleaned up well, and I filled the old mounting holes with epoxy and resecured the fuel tank with new mounting straps to sit on dri-dek so that water can flow under the tank. While I had the seat out I also refinished the seat legs that were sun faded, because why not?
View attachment 120732
The biggest project besides the wiring was the teak. I decided to remove every piece of teak from the boat and sand everything down. After some reading instead of finishing with teak oil I ended up using Semco Teak Sealer. It was super easy to apply and the upkeep should be fairly straight forward hopefully. It doesn't shine like oil or varnish nor does it really affect the color of the teak itself, it just looks like clean teak and now the water beads right off. Console doors got all new stainless hinges and cabinet locks. In front of the console there are what are supposed to be two mahogany cooler chocks attached to the floor. Upon removal to refinish, one was rotted out and was not mahogany. I contemplated making new chocks from scratch, but ended up buying replacement chocks from Boston Whaler that were used on the 90s boats that are made of of starboard.
View attachment 120733
View attachment 120734
View attachment 120735
View attachment 120736
All in all, it's still a 38 year old boat with some minor bumps and bruises to show for it, but I'm pretty damn happy with how it turned out. Now I'm afraid to get it dirty.




Now for some mundane stuff...
The 30yr old switch panel was starting to take a dump. Multiple switches were going dead, plus it was ugly and didn't have modern comforts like a voltage meter and USB charging ports.
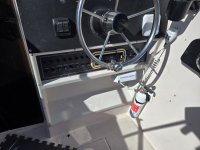
Cut a new piece of starboard, popped this new 8 gang switch panel on it, popped in the stereo, redid some wires, and now all my pumps and lights work again
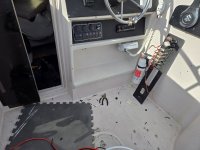
The 30yr old switch panel was starting to take a dump. Multiple switches were going dead, plus it was ugly and didn't have modern comforts like a voltage meter and USB charging ports.
Cut a new piece of starboard, popped this new 8 gang switch panel on it, popped in the stereo, redid some wires, and now all my pumps and lights work again

Warning long post ahead.
Just buttoned up the spring projects on the whaler. As usual, what started as a couple small projects turned into just about a full interior refresh. I also did a poor job of before and during photos.
The first thing I wanted to accomplish was relocating the battery to under the center console like they started doing in the early 90s on the Montauk. This is the best before pic I have, but on the classic whalers the batteries were mounted to the deck of the boat taking up valuable real estate.
View attachment 120729
The battery relocation turned into a full rewire. New longer 2 gauge battery cables to the new battery in the console, all new wiring/battery switch/breaker/fuse panel in the console, new horn, new usb ports, new bilge pump and wiring, new waterproof junction box in the rear for the navigation lights. Not the prettiest under the console, but everything is at least tucked out of the way and should allow for storage without things getting hung up on wiring. The floor of the console I cut out for the battery box to rest on the deck of the boat on a piece of dri-dek, similar to what they switched to in the early 90s. While I was working on the console I cleared off the top except for the Garmin and cupholder and cut out a section of EVA boat decking to cover all the leftover holes.
View attachment 120730
View attachment 120737
The fuel tank mounted under the seat didn't sit quite right between some strips of wood that attached to the deck, and the tank itself was laying right on the deck of the boat. I removed the seat and mounting strips and found this under the tank:
View attachment 120731
It was some sort of slimy concoction of dirt/grime/water/who knows what else, but it cleaned up well, and I filled the old mounting holes with epoxy and resecured the fuel tank with new mounting straps to sit on dri-dek so that water can flow under the tank. While I had the seat out I also refinished the seat legs that were sun faded, because why not?
View attachment 120732
The biggest project besides the wiring was the teak. I decided to remove every piece of teak from the boat and sand everything down. After some reading instead of finishing with teak oil I ended up using Semco Teak Sealer. It was super easy to apply and the upkeep should be fairly straight forward hopefully. It doesn't shine like oil or varnish nor does it really affect the color of the teak itself, it just looks like clean teak and now the water beads right off. Console doors got all new stainless hinges and cabinet locks. In front of the console there are what are supposed to be two mahogany cooler chocks attached to the floor. Upon removal to refinish, one was rotted out and was not mahogany. I contemplated making new chocks from scratch, but ended up buying replacement chocks from Boston Whaler that were used on the 90s boats that are made of of starboard.
View attachment 120733
View attachment 120734
View attachment 120735
View attachment 120736
All in all, it's still a 38 year old boat with some minor bumps and bruises to show for it, but I'm pretty damn happy with how it turned out. Now I'm afraid to get it dirty.
That’s looking great! Hope to see you out on the water to get a better look at her. Bow mount still being considered?
new lightweight seat mounted a foot forward from the heavier replaced one...on a 13' x 6' cat hull, such things actually matter on underway trim.
New EVA foam on surfaces...cut from $15 Amazon yoga mat, stuck on w/Gorilla Grip contact spray adhesive, holds fine, peels off easy enough.
Mounted a waterproof box behind operator, holds first aid kit, air horn, sunscreen, cell phone, etc
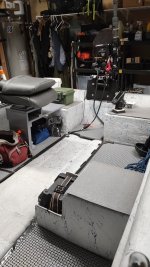
New EVA foam on surfaces...cut from $15 Amazon yoga mat, stuck on w/Gorilla Grip contact spray adhesive, holds fine, peels off easy enough.
Mounted a waterproof box behind operator, holds first aid kit, air horn, sunscreen, cell phone, etc

Absolutely. It's on the list when the funds allow.That’s looking great! Hope to see you out on the water to get a better look at her. Bow mount still being considered?
I'll keep an eye out for that seafoam green whaler!

I love what you've done with my boat!Warning long post ahead.
Just buttoned up the spring projects on the whaler. As usual, what started as a couple small projects turned into just about a full interior refresh. I also did a poor job of before and during photos.
The first thing I wanted to accomplish was relocating the battery to under the center console like they started doing in the early 90s on the Montauk. This is the best before pic I have, but on the classic whalers the batteries were mounted to the deck of the boat taking up valuable real estate.
View attachment 120729
The battery relocation turned into a full rewire. New longer 2 gauge battery cables to the new battery in the console, all new wiring/battery switch/breaker/fuse panel in the console, new horn, new usb ports, new bilge pump and wiring, new waterproof junction box in the rear for the navigation lights. Not the prettiest under the console, but everything is at least tucked out of the way and should allow for storage without things getting hung up on wiring. The floor of the console I cut out for the battery box to rest on the deck of the boat on a piece of dri-dek, similar to what they switched to in the early 90s. While I was working on the console I cleared off the top except for the Garmin and cupholder and cut out a section of EVA boat decking to cover all the leftover holes.
View attachment 120730
View attachment 120737
The fuel tank mounted under the seat didn't sit quite right between some strips of wood that attached to the deck, and the tank itself was laying right on the deck of the boat. I removed the seat and mounting strips and found this under the tank:
View attachment 120731
It was some sort of slimy concoction of dirt/grime/water/who knows what else, but it cleaned up well, and I filled the old mounting holes with epoxy and resecured the fuel tank with new mounting straps to sit on dri-dek so that water can flow under the tank. While I had the seat out I also refinished the seat legs that were sun faded, because why not?
View attachment 120732
The biggest project besides the wiring was the teak. I decided to remove every piece of teak from the boat and sand everything down. After some reading instead of finishing with teak oil I ended up using Semco Teak Sealer. It was super easy to apply and the upkeep should be fairly straight forward hopefully. It doesn't shine like oil or varnish nor does it really affect the color of the teak itself, it just looks like clean teak and now the water beads right off. Console doors got all new stainless hinges and cabinet locks. In front of the console there are what are supposed to be two mahogany cooler chocks attached to the floor. Upon removal to refinish, one was rotted out and was not mahogany. I contemplated making new chocks from scratch, but ended up buying replacement chocks from Boston Whaler that were used on the 90s boats that are made of of starboard.
View attachment 120733
View attachment 120734
View attachment 120735
View attachment 120736
All in all, it's still a 38 year old boat with some minor bumps and bruises to show for it, but I'm pretty damn happy with how it turned out. Now I'm afraid to get it dirty.

great refresh on a classic!Warning long post ahead.
Just buttoned up the spring projects on the whaler. As usual, what started as a couple small projects turned into just about a full interior refresh. I also did a poor job of before and during photos.
The first thing I wanted to accomplish was relocating the battery to under the center console like they started doing in the early 90s on the Montauk. This is the best before pic I have, but on the classic whalers the batteries were mounted to the deck of the boat taking up valuable real estate.
View attachment 120729
The battery relocation turned into a full rewire. New longer 2 gauge battery cables to the new battery in the console, all new wiring/battery switch/breaker/fuse panel in the console, new horn, new usb ports, new bilge pump and wiring, new waterproof junction box in the rear for the navigation lights. Not the prettiest under the console, but everything is at least tucked out of the way and should allow for storage without things getting hung up on wiring. The floor of the console I cut out for the battery box to rest on the deck of the boat on a piece of dri-dek, similar to what they switched to in the early 90s. While I was working on the console I cleared off the top except for the Garmin and cupholder and cut out a section of EVA boat decking to cover all the leftover holes.
View attachment 120730
View attachment 120737
The fuel tank mounted under the seat didn't sit quite right between some strips of wood that attached to the deck, and the tank itself was laying right on the deck of the boat. I removed the seat and mounting strips and found this under the tank:
View attachment 120731
It was some sort of slimy concoction of dirt/grime/water/who knows what else, but it cleaned up well, and I filled the old mounting holes with epoxy and resecured the fuel tank with new mounting straps to sit on dri-dek so that water can flow under the tank. While I had the seat out I also refinished the seat legs that were sun faded, because why not?
View attachment 120732
The biggest project besides the wiring was the teak. I decided to remove every piece of teak from the boat and sand everything down. After some reading instead of finishing with teak oil I ended up using Semco Teak Sealer. It was super easy to apply and the upkeep should be fairly straight forward hopefully. It doesn't shine like oil or varnish nor does it really affect the color of the teak itself, it just looks like clean teak and now the water beads right off. Console doors got all new stainless hinges and cabinet locks. In front of the console there are what are supposed to be two mahogany cooler chocks attached to the floor. Upon removal to refinish, one was rotted out and was not mahogany. I contemplated making new chocks from scratch, but ended up buying replacement chocks from Boston Whaler that were used on the 90s boats that are made of of starboard.
View attachment 120733
View attachment 120734
View attachment 120735
View attachment 120736
All in all, it's still a 38 year old boat with some minor bumps and bruises to show for it, but I'm pretty damn happy with how it turned out. Now I'm afraid to get it dirty.
This beast just cruised by. $20 million refit and $18 million asking price. Seems like a bad investment.


Question: are the new lithium batteries a good upgrade?
Anyone have some experience with them as a trolling motor battery?? or as a battery in my lil travel trailer?
Cost? Hassles?advice?
Anyone have some experience with them as a trolling motor battery?? or as a battery in my lil travel trailer?
Cost? Hassles?advice?
I'm using three of them with my 36v minn kota. It's all I've used so can't compare, but I've been very happy with them.Question: are the new lithium batteries a good upgrade?
Anyone have some experience with them as a trolling motor battery?? or as a battery in my lil travel trailer?
Cost? Hassles?advice?

If you are talking about the LiFePo4 batteries they make excellent trolling motor batteries. I would bite the bullet and get a 100ah and the appropriate charger for it. These batteries charge differently and the old charger in your garage will not be compatible.
For your trailer they are also a good option under the right conditions. But again you will need to replace the converter in your power center to one that is compatible with the batteries. I use two 100ah batteries in my trailer and a pair of 180 watt solar panels to keep them charged. Inside I have wired in a 500 watt inverter to run my laptop and Starlink. If you plan on a lot of camping in sub-freezing weather then know that charging them in freezing weather can eventually lead to ruining them. You can also get batteries with a management system that will prevent charging when below 32 degrees.
For your trailer they are also a good option under the right conditions. But again you will need to replace the converter in your power center to one that is compatible with the batteries. I use two 100ah batteries in my trailer and a pair of 180 watt solar panels to keep them charged. Inside I have wired in a 500 watt inverter to run my laptop and Starlink. If you plan on a lot of camping in sub-freezing weather then know that charging them in freezing weather can eventually lead to ruining them. You can also get batteries with a management system that will prevent charging when below 32 degrees.
I can't speak to boats, but I bought a 24V Lithium ion Battery to power my CPAP camping battery earlier this year. In the past that was accomplished by two Group27 deep cycle batteries along with a pure sine wave inverter. Those batteries were typically charged each day by my Honda Eu2000i gas generator. Since switching to the Lithium ion(which are significantly smaller in size than two Group27 batteries), I haven't fired up my generator at camp so far this year. Game changer!
Last edited:
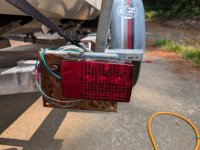
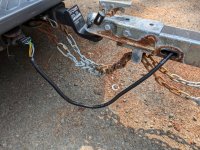
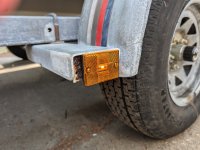
Nothing like hopping into the truck to go fill up the boat for the weekend and realizing all of the trailer lights are shot. Overnighted parts from Amazon and rewired the whole trailer with LED tail and marker lights. Dedicated ground wires to each light directly to the plug to eliminate grounding to the frame issues.