The one about the winter floor replacement project...

Guy Gregory

Semi-retired
Forum Supporter
In the tradition of Evan, I'm setting out to spruce up and repair a new to me boat. See https://pnwflyfishing.com/forum/index.php?threads/evans-boat-projects-floor-replacement.6292/ for further inspiration. This project I figure will take all winter.
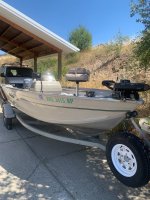
2024-08-01 13.37.12.jpg
The boat at the center of our story: a 2002 Lowe Sea Nymph V AN165. Riveted hull. 40hp Yamaha 4 stroke that runs well, a bow mount MinnKota Terrova with wireless remote, and a Humminbird 596eHD sonar unit. At purchase I liked it because it was very inexpensive for 4-stroke power, it's a bit smaller and lighter than similar boats, and this boat will be used on small-medium inland freshwater chasing trout a lot, but also pursing carp and bass. The boat does have pretty good mojo, here's my son:
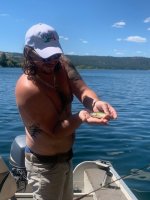
2024-07-31 16.56.17.jpg

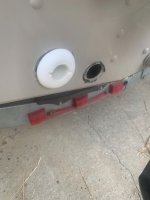
As with all old boats, the wiring was a mess and required repair to run reliably immediately. We're reliable now, straightening out the rest of the nest will be part of the winter project. I've replaced the seat mounts as the others were fused together to the bases as they are wont to do with time, and trailer bearings and parts, yada yada. The boat makes an unreasonable amount of water into the bilge, so I am initially expecting seam leaks, though the thru hull fittings for the livewell system are not sealed to my satisfaction, and I suspect some of those hoses may be compromised. I'm pretty suspicious of a livewell anyway...should I actually keep it?

I'm thinking of naming the boat Cinco: it's my fifth boat, and, well, it kinda leaks.

Biggest issue: the floor. Bad juju. Carpet deteriorated to the point where it actually saved labor: little bits of it would blow out as you cruised down the highway to the launch. The plan, rip out the carpet, examine the hull and such things for leaks, and replace the deteriorating deck board and covering.
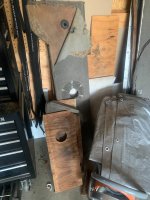
2024-09-11 10.41.57.jpg2024-09-11 10.41.46.jpg
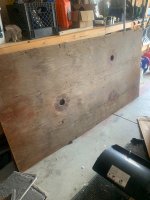
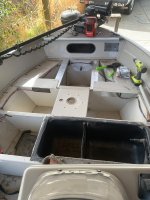
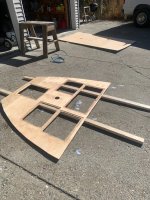
So, over the course of a day I disassembled the interior seats and console, then gathered up one garbage bag full of icky old carpet. After vaccuming about 2/3 of a cubic yard of sand and general debris, I found the deck had been fastened with 1 1/4" steel (magnetic) self tapping screws into the aluminum frame. They came right out, so I've retained the original floor material. It's too deteriorated to use. It appears to be 15/32" ACX exterior plywood, perhaps treated.
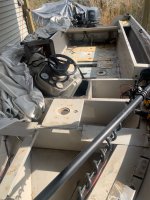
2024-09-11 10.44.20.jpg

I've examined the hull remaining, and there is no waterlogged or otherwise even damp floatation foam in the bottom of the hull. Excellent news. There are a couple of broken deckbeams which I'll try to find extrusions for, but in general, the hull seems in great shape. I haven't given the livewell plumbing a thorough inspection yet.

Next steps: 1) measure and acquire proper amounts of new plywood for the deck, and trim out new pieces. Seal with Thompson's or some equivalent sealer; 2) replace broken deck beams; 3) Decide whether to keep livewell, if so inspect, repair and replace parts as necessary, adding seacocks on the through-hull fittings; 4) decide on flooring options ....carpet, vinyl, EVA foam, other?? and install. Last will be reassembly and finally refreshing the wiring.

For those of us embarking upon similar projects, I present this as an example> maybe not a good example, but an example.

Cheers!
 
I think you’re right about the livewell. I’ll need to figure out how to plug the through-hulls, but I can’t be the first to do that. I’m thinking I”ll leave the box and the drain. I’ll cut the drain hose to drain to the bilge, insulate the livewell box with expando-foam, and viola! Instant ice chest!

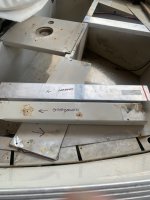
I went looking for extrusions at my local supplier today, nothing similar, so I got same size rectangular tube, about twice the wall thickness. Cut and trimmed, waiting for rivets. Old v. new below. Actually inspection reveals lots of damaged rivets in the deckbeam structure in the forward bulkheads, I’ll be replacing all those fasteners. IMG_2900.jpeg
 
I love these threads, and I hope you enjoy the project. I just wish I had the time, space, or skills to do something like this. I guess I will just keep following along as you all do cool stuff! I look forward to updates. (y)
 
Ah, decisions, decisions. First, on the thru-hulls for the livewell.

I kept it. The fittings themselves were only hand tight, and came out easily. The sealant around them was toast. I went looking for a plug for the holes, and the only thing I found satisfactory was "Weld 'em up". 2024-09-17 10.26.51.jpgAluminum welding is not in my repertoire, so I decided to reuse the thru-hull fittings, sealed properly with new 3M 4200 sealant, and then seated to a reasonable torque.

I'm gonna plug the pump inlet with a removable drain plug, and then use the plastic livewell for an icechest. It'll save deck space otherwise devoted to an icechest, and it'll self drain. If all this doesn't work, I'll have it welded next year.

Moving forward, I refastened a lot of damaged rivets forward of the main bulkhead.2024-09-21 13.38.41.jpg 3/16 aluminum pop rivets seem to be a reasonable replacement for the previous fasteners,

Then, wiring. The existing wiring is a maresnest of engine control and other wires, all ziptied together in a big ol' f-in' ball. First order of business, get the ball unwound. Once unwound it was pretty clear that some previous owner had hashed in something in the engine-on circuit, I speculate a UHF. It was relatively easy to track the cuts to the splices and straighten them up. Wiring in general is pretty long, but there is a side deck right near the dash the long wires can be ziptied like-to-like and stored properly. So, that is done, and the clutter under the side console will decrease significantly.

A trifle more small work refastening light sockets forward, and I'll swab her out and get ready for flooring. I bought the plywood decking today, 15/32" ACX and a sealer will do the trick, the original underlayment looks like 15/32" (maybe 7/16?) CDX, not sealed, and it is 22 years old. My repairs will outlast my ownership, I'm at an age where lifetime guarantee doesn't mean what it used to mean.

I still am puzzled on surface: carpet is nice on the feet for me and my wife and dog, some of the pvc stuff looks nice but ...., vinyl is just, well, vinyl. The teak and holly looking stuff is really cool, but if I don't get it straight or match I'll see every error for the rest of my days and be grumpy.

Oh, and while I was at it, plugs/oil/oilfilter/lower unit and stabilizer in the gas tank. I'll keep you posted.
 
Ah yes, back to the saga.

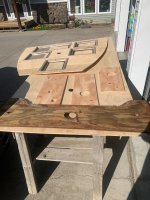
2 sheets of ACX handled the job. 1 4x8 sheet for the main deck area, the other cut and spliced for the foredeck and the small sidedeck pieces. The original pieces where some extra was required used a bazillion steel staples to hook them together, I've chosen glued half lap joints. I used the old pieces for pattern's and cut everything out.2024-10-02 12.13.06.jpg

Half laps also helps my material usage..there are two long, narrow pieces on each side of the rod lockers, a bit of lap jointing with a router grafted short pieces into long ones. All glue done with polyurethane glue (what wonderful stuff...!). All plywood was covered front, back, and edges with 2 coats of exterior water sealer. I'm sure this stuff will outlast my ownership. By cobbling together some of the pieces, I had very little left over from 2 sheets.

Now, what to use to cover the plywood? EVA foam, lovely, often self adhesive. Spendy. Most popular is the teak-and-holly look, or similar. If the lines don't line up fore and aft, I'm gonna hate it. So, maybe something else. Vinyl? again, beautiful material, lots of choices of colors and patterns. Slippery. Spendy. My experience installing vinyl flooring myself has been, well, unsatisfactory. And the main problem with all of these is the numerous hatches and hatch covers needing coverage, with the difficulty of getting them all on the same line, and wrapped to snug down properly.

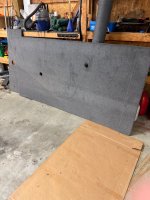
Yup, I went carpet. Marine grade 20 oz carpet. New carpets are quite superior to the material that came on this boat, and again, I'm hoping it will last beyond my ownership. How to estimate needed yardage? I researched plenty of fancyass pattern software programs, but settled for laying the pieces out on the 4x8 sheet and adding some extra for needed gaps and such. 2024-10-13 12.34.08.jpg2024-10-13 12.22.59.jpg
I ultimately settled on 16 feet of 81/2 foot wide carpet from a widely known supplier of marine and boating stuff. The FedEx guy didn't seem pleased to deliver the package, I can only imagine the stuff they have to deliver to folks.

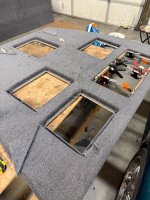
The hatches on the foredeck are flush, so I needed to let them in to the plywood and rivet them down, again, router skills and homemade jigs are called upon.

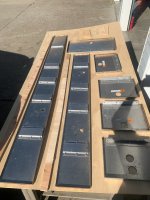
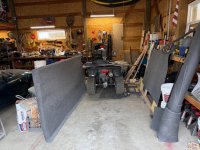
So now I'm carpeting. The 4x8 piece was unwieldy. I glued down the carpet on the face with indoor/outdoor carpet glue using a spreader, after curing overnight I turned it over and stapled the carpet edges to the back side with stainless steel staples. That got glued with 3M 77 spray glue. Here's the big pieces with my snowplow to scale. 2024-11-03 09.48.26.jpg2024-10-28 14.17.37.jpg

After this it gets fiddly, and the temperature isn't helping. The hatches and hatch lids all are wrapped. For the big surfaces on the hatch lids I'll likely use 3M77, with my space heater running in the garage to get it above 50F. For the hatch edges, I'm using polyurethane glue, which seems ok above 40F or so, if clamped and left alone. It's kinda fiddly and requires some patience, but it's looking okay.2024-11-03 10.04.54.jpg

Next steps, get the hatch lids carpeted and re-riveted to the hatch frames. Clean and detail the inside of this nearly 20 year old boat, then install and fasten both floors. Then work on rod lockers and other side deck pieces, re-installing some lights and other things that needed removal during deck removal. I'm hoping to be ready for a trip to Rufus in late February/early March.

Thanks for looking, I'm interested in any thoughts you have.
 
regarding leaks = roll a couple of coats of Sea Hawk Tuff Stuff high build epoxy from the water line down, finished with a coat of something like Rustoleum hull paint= leaks gone, banished, over with.
 
Well, here we are. I've carpeted 18 individual pieces, and got 16 installed. I've learned a few things.

  • 20 ounce carpet is thicker than 16 ounce carpet. It occupies more space. Thus, if it fits, it's probably a bit tight. If it doesn't fit, you'll need to redo it.
  • When the guys on youtube say "use a sharp knife" to cut carpet, they aren't kidding. I went through 14 snap knife blades. And in the end I'm happy about it.
  • Carpet glued with indoor outdoor carpet glue will stay glued. Really. It won't come off. So if you're part is too big, it's not saveable.

In the end I came up a bit short on carpet as the narrow side pieces between the locker and the hull were cut using the existing pieces as a pattern, and they turned out too wide. Too wide even to hammer them into place. (FYI, I am known for substituting force for precision on fitment issues...) I have ordered another piece of carpet for this and will be cutting and fitting new plywood for the base. Also, I ended up doing the console, but not the inside because I was out of carpet. I painted the inside of the console. I'll now have enough carpet to do it, but the paint looks okay and it's getting cold.

I've got a few fastenings to replace, and a few wires that had to be cut to remove the console that I need to re-connect, and I'm gonna upgrade the electronics to talk to the bow mount motor and provide speedo and charting capability. Other than that it's install the seats, get out the PFD's and dock lines, and go fishing.

If you do this, it'll take time. I recommend having heat in your shop so the glue will kick off. Also, get new shopvac filters and update your broom because as always on boat projects, you cannot f@#%k up when you clean up. But in the end, it'll look brand new. I'll probably wish I'd done marine vinyl or something, but for now I'm putting my money into electronics and gas. Coffeepot, Rufus, Fishtrap, Potholes, Marshall, Banks, yup, we'll be there.

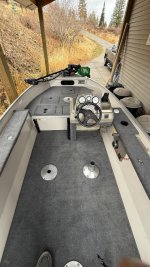
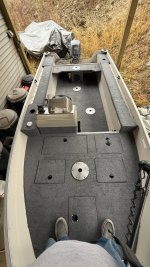
Here are fore and aft views. 2024-11-23 13.18.56.jpg2024-11-23 13.18.42.jpg

Cheers, everyone! Happy holidays!
 
Okay, here's spring, and because I've my whole house emptied for new paint and carpet, I've no room in the driveway to finish the last project on the boat, but by mid next week we'll be there.

After last falls trailer upgrades, motor maintenance, wiring redux, and new decks and carpet:
  • I moved the existing humminbird 596 to the bow, and hooked it into the temp/depthsounder on the bow mount trolling motor.
  • I installed a Humminbird Helix 7 CHIRP Mega SI/DI wah f'in' hoo yadda yadda on the helm station, and yeah, I bought the charts. I'll get it dialed in on the first voyage, and since the ice is off the lakes, that's gonna be soon.
  • I noticed the batteries were old: lead acid units, finally saw the year stickers. The starting battery (Group 24) was purchased in 2010, the motor battery (Group 27) in 2013. They've been in the garage all winter, and after charging I tested them, and weak they were. I found a sale at Cabelas over presidents day and upgraded to same group AGM batteries. The force is with them.

Last thing to do, really...I'm gonna pull the hubs and check (and very likely) redo the wheel bearings.

With that, this puppy oughta be a splash and go unit until fall. Maybe make the Carp Clave???
 
Back
Top