
Navigation
Install the app
How to install the app on iOS
Follow along with the video below to see how to install our site as a web app on your home screen.
Note: This feature may not be available in some browsers.
More options
Style variation
You are using an out of date browser. It may not display this or other websites correctly.
You should upgrade or use an alternative browser.
You should upgrade or use an alternative browser.
Evan's boat projects: The next chapter
- Thread starter Evan B
- Start date


Well either way, my Honda won't fit that far over. So I need to re drillSome deep v hulls are done that way. I would call manufacturer
That's what I'm reading on too. But it sounds like the offset makes a pretty minimal difference compared to things like trim tabs.My understanding is deep v hulls in heavy water with propeller torque at higher power causes excess rolling. Depends on boat. Could I be wrong, yes.
Shower thoughts:
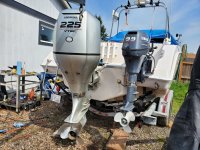
I'm going to bolt the Honda 225 on there and fish it for this season as it is. If I decide this is a hull I want to hang on to for a few years, I'm going to do another transom rebuild after the fall tuna and salmon wraps up. Everything seems rock solid, but as with all fiberglass boats, water does get in to the core, and it shows signs of it when drilling out. Not bad and rotted, but damp. The fiberglass on the inside and outside are both more than enough to support the engine on their own, so I have no problem running it like this at all. But a fresh core would be nice to have.
It'll be a whole lot easier than the conversion project, and would likely be done from the outside due to the splashwell making the inside hard to access. So I wouldn't need to cut in to the stringers/knee braces or do much of anything than remove the exterior glass, chip away at the old core, then build a new core and put fresh glass up. Easy peasy
I'll get all that done before tackling my main project which is figuring out what to do with the cuddy. I'll take pics of that next time I'm out there. But they stripped it bare. So what once was covered in marine carpet and other finishes is now bare, unfinished fiberglass with some cubbies in the floor where the cushions used to sit.
I'm going to bolt the Honda 225 on there and fish it for this season as it is. If I decide this is a hull I want to hang on to for a few years, I'm going to do another transom rebuild after the fall tuna and salmon wraps up. Everything seems rock solid, but as with all fiberglass boats, water does get in to the core, and it shows signs of it when drilling out. Not bad and rotted, but damp. The fiberglass on the inside and outside are both more than enough to support the engine on their own, so I have no problem running it like this at all. But a fresh core would be nice to have.
It'll be a whole lot easier than the conversion project, and would likely be done from the outside due to the splashwell making the inside hard to access. So I wouldn't need to cut in to the stringers/knee braces or do much of anything than remove the exterior glass, chip away at the old core, then build a new core and put fresh glass up. Easy peasy
I'll get all that done before tackling my main project which is figuring out what to do with the cuddy. I'll take pics of that next time I'm out there. But they stripped it bare. So what once was covered in marine carpet and other finishes is now bare, unfinished fiberglass with some cubbies in the floor where the cushions used to sit.
Happens to 100% of glass boats.Wet wood inside fiberglass. I spent 4 years in the USCG and saw so many issues from that. Especially in the bilge where inboard motors attach. Who would think that if you drill a hole in fiberglass the core would get wet.


Don't be hard on yourself. I It looks like you're doing an excellent job.Unless the original owner had a morbidly obese fishing partner he was trying to offset, then I think the reason for it is shoddy work at the factory.
I spent time cleaning it up and busted out the fiberglass and resin to do a proper patch job. Got the glass set over the holes which I'll be filling with thickened epoxy from the other side. Also reinforced the corners of the splash well with a few layers of glass while I was at it. In a day or two, i'll sand the glass down and do some gelcoat over it.
Gonna be at least another full weekend of work to get this thing together. Didn't make it very far after the hole alignment discovery.
View attachment 11957View attachment 11956View attachment 11955View attachment 11954View attachment 11953

Paige
Wishing I was fishing the Sauk
Evan, look at Coosa board when you redo the transom, if I remember right it has .1% water absortion.
I've seen a couple videos of people redoing transom with it, they usually do 2 1" thick pieces with the heavy weave fiberglass in between, and fully wrapped and finished off
I've seen a couple videos of people redoing transom with it, they usually do 2 1" thick pieces with the heavy weave fiberglass in between, and fully wrapped and finished off
Very familiar with the stuff. It's a hell of a lot harder to work with and way more expensive, so I opted for plywood on the last boat. Plywood is totally fine if you do it right, which I try to do. I use multiple sheets soaked in penetrating epoxy so it'll last a hell of a long time with properly sealed thru-holes.Evan, look at Coosa board when you redo the transom, if I remember right it has .1% water absortion.
I've seen a couple videos of people redoing transom with it, they usually do 2 1" thick pieces with the heavy weave fiberglass in between, and fully wrapped and finished off
Made decent progress today. The "new" boat is just about there.
Before any of you cringe, I didn't have a 4" hole saw. Had to cut the dash a bit to fit my sea star hydraulic helm pump.
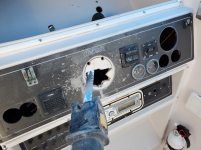
After the helm installation and running the hydraulic lines back to the steering mechanism, got both sets of controls installed and all cables run back to the engines.
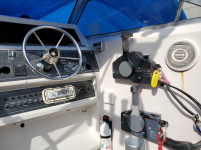
Took lots of cutting and drilling, but progress was good this weekend. Once I get the old gas pumped out, everything will basically be set to go. I do still need to get my Garmin NMEA cables out of the old boat and on this one as well. But other than some cosmetic things like the dash panels and a few other random things, it's about there.
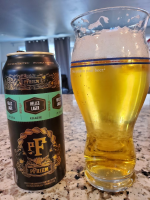
After I wrapped up, I went for a 3mi run and then kicked back with my favorite beer of all time.
Before any of you cringe, I didn't have a 4" hole saw. Had to cut the dash a bit to fit my sea star hydraulic helm pump.
After the helm installation and running the hydraulic lines back to the steering mechanism, got both sets of controls installed and all cables run back to the engines.
Took lots of cutting and drilling, but progress was good this weekend. Once I get the old gas pumped out, everything will basically be set to go. I do still need to get my Garmin NMEA cables out of the old boat and on this one as well. But other than some cosmetic things like the dash panels and a few other random things, it's about there.
After I wrapped up, I went for a 3mi run and then kicked back with my favorite beer of all time.

assuming you know about Jamestown Distributors? They have the best paper catalog for all things boat available upon request. Prefer them to West Marine, great selection, better prices.
I've spent many, many dollars with them. I have a discount code through Boatworks Today since I support his YouTube channel (also where I learned a great deal on how to do fiberglass work).assuming you know about Jamestown Distributors? They have the best paper catalog for all things boat available upon request. Prefer them to West Marine, great selection, better prices.
What in the absolute F!!? Man, that had to be frustrating - seems unreal it would be that far off from the factory. I wonder if they did it to offset the weight of the kicker or something? Still, seems too silly to be on purpose.Unless the original owner had a morbidly obese fishing partner he was trying to offset, then I think the reason for it is shoddy work at the factory.
I spent time cleaning it up and busted out the fiberglass and resin to do a proper patch job. Got the glass set over the holes which I'll be filling with thickened epoxy from the other side. Also reinforced the corners of the splash well with a few layers of glass while I was at it. In a day or two, i'll sand the glass down and do some gelcoat over it.
Gonna be at least another full weekend of work to get this thing together. Didn't make it very far after the hole alignment discovery.
View attachment 11957View attachment 11956View attachment 11955View attachment 11954View attachment 11953
same...been repairing glass boats for decades, JD my go to...I've spent many, many dollars with them. I have a discount code through Boatworks Today since I support his YouTube channel (also where I learned a great deal on how to do fiberglass work).
To the part of the project I was dreading: WIRING!
Got all my fuel lines hooked up today. Currently waiting on some custom plastic pieces I'm having made for my dash panel and flush mount chartplotter, so started doing the electrical work. Not my favorite. It went so smoothly on the Striper project, but I can tell this one is going to stump me, and already is.
Started by hooking up my Yamaha 9.9 kicker (the Honda main hooked up the other day and is all powered and ready to go). I run a separate circuit for my kicker and electronics. So I had to re-hook up both ends of the battery cable, on the engine and on the battery. Turns out I didn't pay close enough attention when I unhooked it a few weeks ago, because it's not as cut and dry and simple as the other engines I've done over the years. There's actually a few connections that have to be made, and it isn't obvious where they go. So after two hours of trial and error, I gave up. Found the service manuals online and still don't know what to do. So this should be a fun puzzle to solve.
I then moved to hooking the rest of the wiring up - bilge pump, dash, etc etc. I didn't unhook anything when I removed the old engine and the controls, so not much should have changed. Yet nada on finding power there either. I have multiple batteries on board and tried direct connections to all of them with no dice. So it looks like I get to spend this weekend running new wires and just doing it all over again.
hoping a Yamaha fairy finds my kicker and fixes whatever I messed up there.
So very close, yet so far away from being able to run it.
Got all my fuel lines hooked up today. Currently waiting on some custom plastic pieces I'm having made for my dash panel and flush mount chartplotter, so started doing the electrical work. Not my favorite. It went so smoothly on the Striper project, but I can tell this one is going to stump me, and already is.
Started by hooking up my Yamaha 9.9 kicker (the Honda main hooked up the other day and is all powered and ready to go). I run a separate circuit for my kicker and electronics. So I had to re-hook up both ends of the battery cable, on the engine and on the battery. Turns out I didn't pay close enough attention when I unhooked it a few weeks ago, because it's not as cut and dry and simple as the other engines I've done over the years. There's actually a few connections that have to be made, and it isn't obvious where they go. So after two hours of trial and error, I gave up. Found the service manuals online and still don't know what to do. So this should be a fun puzzle to solve.
I then moved to hooking the rest of the wiring up - bilge pump, dash, etc etc. I didn't unhook anything when I removed the old engine and the controls, so not much should have changed. Yet nada on finding power there either. I have multiple batteries on board and tried direct connections to all of them with no dice. So it looks like I get to spend this weekend running new wires and just doing it all over again.
hoping a Yamaha fairy finds my kicker and fixes whatever I messed up there.
So very close, yet so far away from being able to run it.
Gonna freshen up some of the plastics  had them custom cut at Tap Plastics in Portland. Was much cheaper than I anticipated. Dash panel will need two more holes but wanted to place them after I put it up and decide where I want those gauges.
especially excited about the flush mount Garmin chartplotter
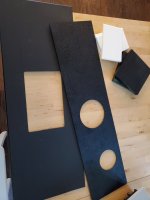
had them custom cut at Tap Plastics in Portland. Was much cheaper than I anticipated. Dash panel will need two more holes but wanted to place them after I put it up and decide where I want those gauges.especially excited about the flush mount Garmin chartplotter
Last edited: