Navigation
Install the app
How to install the app on iOS
Follow along with the video below to see how to install our site as a web app on your home screen.
Note: This feature may not be available in some browsers.
More options
Style variation
You are using an out of date browser. It may not display this or other websites correctly.
You should upgrade or use an alternative browser.
You should upgrade or use an alternative browser.
Trolling motor on a Stealth Pro?
- Thread starter dbaken
- Start date

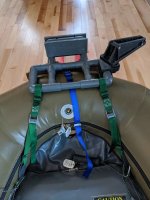
Haggis and I have done it with our Scouts. Outcast even makes a motor mount bracket for the Stealth.
https://www.outcastboats.com/product/frameless-motor-mount/
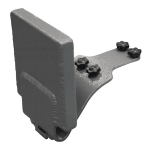
I'd make sure you check the bracket height off the water before you select a motor. I'm guessing a 30" shaft will work fine. I have a 24" Watersnake but had to do some cutting and heat gun action on the plastic motor mount work.
We both use a kayak type steering arm on the shaft and use control lines aft to a couple jump rope handles to steer.
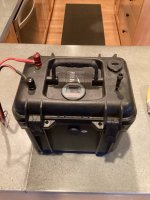
I built a weatherproof battery box with variable speed controller for power.
https://www.outcastboats.com/product/frameless-motor-mount/
I'd make sure you check the bracket height off the water before you select a motor. I'm guessing a 30" shaft will work fine. I have a 24" Watersnake but had to do some cutting and heat gun action on the plastic motor mount work.
We both use a kayak type steering arm on the shaft and use control lines aft to a couple jump rope handles to steer.
I built a weatherproof battery box with variable speed controller for power.

Yes, I bought a plate that fits on the stern using the basic Stealth Pro bolts and holds an electric motor. They should still be available. Don't have the details in front of me right now and am away from our place. If you don't get better information between now and the New Year send me a P.M. then.

Yep but on an outcast. Do recommend!
I was worried about mounting the plate to the glue on pads due to the weight and thrust. It was NOT a problem.
Get a bigger motor. I have a Newport 45. There is a lot more drag than a hard shell boat.
If you’re interested I’ll post my battery set up. It’s pretty slick, at least to me it is.
Finally I’m selling this.
It’s hard to reach back or use an extension on a boat where you are fixed to a seat like the Outcasts. This idea is adopted from the kayak fishing guys. Works!! I don’t need it since I bought a Jon boat where I can crawl around.
I was worried about mounting the plate to the glue on pads due to the weight and thrust. It was NOT a problem.
Get a bigger motor. I have a Newport 45. There is a lot more drag than a hard shell boat.
If you’re interested I’ll post my battery set up. It’s pretty slick, at least to me it is.
Finally I’m selling this.
It’s hard to reach back or use an extension on a boat where you are fixed to a seat like the Outcasts. This idea is adopted from the kayak fishing guys. Works!! I don’t need it since I bought a Jon boat where I can crawl around.
THIS is the right bracket. mickey rat is correct - a 30" shaft on your trolling motor works great.Haggis and I have done it with our Scouts. Outcast even makes a motor mount bracket for the Stealth.
https://www.outcastboats.com/product/frameless-motor-mount/
View attachment 135831
I'd make sure you check the bracket height off the water before you select a motor. I'm guessing a 30" shaft will work fine. I have a 24" Watersnake but had to do some cutting and heat gun action on the plastic motor mount work.
We both use a kayak type steering arm on the shaft and use control lines aft to a couple jump rope handles to steer.
I built a weatherproof battery box with variable speed controller for power.
I haven't come up with a good way to mount both the motor and a rear anchor at the same time and am open to suggestions.

You don't need or want a higher thrust motor on a Stealth Pro.

Haggis57
Steelhead
Installing a motor on the Stealth Pro is pretty straight forward with the mount above. Outcast has produced Video 1 and Video 2 that cover the basics.
As @mickey rat mentioned, I have an Outcast Scout with trolling motor. With the fixed seats that we have in the Outcast Scout and Stealth Pro, I found reaching behind to change speed and steer to be a bit of a pain. Flexibility does not improve with age! However, as mentioned above, the basic installation can be enhanced with a couple of additions from kayakers who have similar issues.
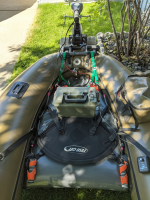
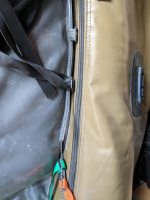
The first thing I did was add some basic steering control arms to the trolling motor shaft as shown in this video. My current rigging for my steering lines is shown in the 1st picture although there's lots of clutter! I am using very thin 3mm black-white paracord. The one improvement I made to my steering lines after the first year was to run the lines inside 1/4" ID flexible plastic tubing to reduce the chance of any of my other crap (rods, fish finder, net, jacket, etc) binding on the steering lines. Home Depot sells this type small tubing in bulk for running water supply to a refrigerator. In the 1st picture, the ends of the tubing are marked with pink tape. In the 2rd picture you can see that I have the tubing anchored to the top of the tie-down loops along the side. I originally just used zip ties to hold the tubing in place and that worked fine. I have some plastic handles (wrapped in orange webbing for the picture) for the end of the lines beside my seat to provide grip. I found that the key to steering is to put pressure on both lines when changing direction. A friend of mine used regular paracord for his steering lines and just used a larger diameter of plastic tubing.
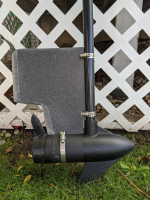
To improve steering at lower speeds I added a rudder to the trolling motor shaft. This is just a dollar store cutting board attached with pipe clamps!
The second enhancement was to add basic motor control beside my seat. My current PWM controller is in the bottom right of the 1st photo. Its attached with Velcro just below the forward d-ring that the seat strap attaches to. My Minn Kota motor has basic 5 speed control which I set to speed 5. I then use the hand controller beside my seat to turn the motor off and on and control the speed. This video shows how to install a basic trolling motor foot switch to give you on-off motor control right beside your seat. Amazon sells 3 or 4 different models of these switches. I used one of these foot switches before I got the PWM controller and it works fine. I located the switch in the same place as my current PWM controller. When using the on-off foot switch, I would leave the motor in speed 2 or 3 for changing locations.
Having basic motor on-off control and steering both right beside my seat has made the use of the trolling motor on my Scout pretty effortless and almost eliminated twisting around in the seat to fiddle with the motor. Both changes were inexpensive and easy to do.
The trolling motor I'm using is Minn Kota C2 30 with 30" shaft and as mentioned above, the 30" shaft it works fine. As @LBL mentioned, there is some drag is these frameless pontoons with the seat being in contact with the water. One reason for going with a bigger motor that Minn Kota's 45lb Endura Max comes with a Digital Maximizer (built-in PWM controller) that will extend you battery life.
The last thing to consider is the battery size and type. If you're not already invested in a marine battery, you should at least consider Lithium. Battery size will depend on how you're going to use the motor. I personally don't use my motor for trolling - I find fins and/or rowing to be more effective. I use the motor to change locations a couple of times a day and for getting back to the launch. On the prairie lakes I fish it always seems like the return to launch at the end of the day is against the wind! I have found that a 35 A-hr AGM type battery is fine for my needs. I estimate I can get at least 1.5 hours at speed 3 with that battery. A larger battery is always nice as mentioned one of the Outcast videos, battery capacity and weight are directly related. My smaller battery only weighs 20 lbs and fits into the green shell box shown in the first picture. When my current battery dies, I'm certainly going to see if my budget can handle a similar sized lithium battery.
Good luck getting powered up!
Ken
As @mickey rat mentioned, I have an Outcast Scout with trolling motor. With the fixed seats that we have in the Outcast Scout and Stealth Pro, I found reaching behind to change speed and steer to be a bit of a pain. Flexibility does not improve with age! However, as mentioned above, the basic installation can be enhanced with a couple of additions from kayakers who have similar issues.
The first thing I did was add some basic steering control arms to the trolling motor shaft as shown in this video. My current rigging for my steering lines is shown in the 1st picture although there's lots of clutter! I am using very thin 3mm black-white paracord. The one improvement I made to my steering lines after the first year was to run the lines inside 1/4" ID flexible plastic tubing to reduce the chance of any of my other crap (rods, fish finder, net, jacket, etc) binding on the steering lines. Home Depot sells this type small tubing in bulk for running water supply to a refrigerator. In the 1st picture, the ends of the tubing are marked with pink tape. In the 2rd picture you can see that I have the tubing anchored to the top of the tie-down loops along the side. I originally just used zip ties to hold the tubing in place and that worked fine. I have some plastic handles (wrapped in orange webbing for the picture) for the end of the lines beside my seat to provide grip. I found that the key to steering is to put pressure on both lines when changing direction. A friend of mine used regular paracord for his steering lines and just used a larger diameter of plastic tubing.
To improve steering at lower speeds I added a rudder to the trolling motor shaft. This is just a dollar store cutting board attached with pipe clamps!
The second enhancement was to add basic motor control beside my seat. My current PWM controller is in the bottom right of the 1st photo. Its attached with Velcro just below the forward d-ring that the seat strap attaches to. My Minn Kota motor has basic 5 speed control which I set to speed 5. I then use the hand controller beside my seat to turn the motor off and on and control the speed. This video shows how to install a basic trolling motor foot switch to give you on-off motor control right beside your seat. Amazon sells 3 or 4 different models of these switches. I used one of these foot switches before I got the PWM controller and it works fine. I located the switch in the same place as my current PWM controller. When using the on-off foot switch, I would leave the motor in speed 2 or 3 for changing locations.
Having basic motor on-off control and steering both right beside my seat has made the use of the trolling motor on my Scout pretty effortless and almost eliminated twisting around in the seat to fiddle with the motor. Both changes were inexpensive and easy to do.
The trolling motor I'm using is Minn Kota C2 30 with 30" shaft and as mentioned above, the 30" shaft it works fine. As @LBL mentioned, there is some drag is these frameless pontoons with the seat being in contact with the water. One reason for going with a bigger motor that Minn Kota's 45lb Endura Max comes with a Digital Maximizer (built-in PWM controller) that will extend you battery life.
The last thing to consider is the battery size and type. If you're not already invested in a marine battery, you should at least consider Lithium. Battery size will depend on how you're going to use the motor. I personally don't use my motor for trolling - I find fins and/or rowing to be more effective. I use the motor to change locations a couple of times a day and for getting back to the launch. On the prairie lakes I fish it always seems like the return to launch at the end of the day is against the wind! I have found that a 35 A-hr AGM type battery is fine for my needs. I estimate I can get at least 1.5 hours at speed 3 with that battery. A larger battery is always nice as mentioned one of the Outcast videos, battery capacity and weight are directly related. My smaller battery only weighs 20 lbs and fits into the green shell box shown in the first picture. When my current battery dies, I'm certainly going to see if my budget can handle a similar sized lithium battery.
Good luck getting powered up!
Ken
Apparently great minds think alikeInstalling a motor on the Stealth Pro is pretty straight forward with the mount above. Outcast has produced Video 1 and Video 2 that cover the basics.
As @mickey rat mentioned, I have an Outcast Scout with trolling motor. With the fixed seats that we have in the Outcast Scout and Stealth Pro, I found reaching behind to change speed and steer to be a bit of a pain. Flexibility does not improve with age! However, as mentioned above, the basic installation can be enhanced with a couple of additions from kayakers who have similar issues.
The first thing I did was add some basic steering control arms to the trolling motor shaft as shown in this video. My current rigging for my steering lines is shown in the 1st picture although there's lots of clutter! I am using very thin 3mm black-white paracord. The one improvement I made to my steering lines after the first year was to run the lines inside 1/4" ID flexible plastic tubing to reduce the chance of any of my other crap (rods, fish finder, net, jacket, etc) binding on the steering lines. Home Depot sells this type small tubing in bulk for running water supply to a refrigerator. In the 1st picture, the ends of the tubing are marked with pink tape. In the 2rd picture you can see that I have the tubing anchored to the top of the tie-down loops along the side. I originally just used zip ties to hold the tubing in place and that worked fine. I have some plastic handles (wrapped in orange webbing for the picture) for the end of the lines beside my seat to provide grip. I found that the key to steering is to put pressure on both lines when changing direction. A friend of mine used regular paracord for his steering lines and just used a larger diameter of plastic tubing.
To improve steering at lower speeds I added a rudder to the trolling motor shaft. This is just a dollar store cutting board attached with pipe clamps!
The second enhancement was to add basic motor control beside my seat. My current PWM controller is in the bottom right of the 1st photo. Its attached with Velcro just below the forward d-ring that the seat strap attaches to. My Minn Kota motor has basic 5 speed control which I set to speed 5. I then use the hand controller beside my seat to turn the motor off and on and control the speed. This video shows how to install a basic trolling motor foot switch to give you on-off motor control right beside your seat. Amazon sells 3 or 4 different models of these switches. I used one of these foot switches before I got the PWM controller and it works fine. I located the switch in the same place as my current PWM controller. When using the on-off foot switch, I would leave the motor in speed 2 or 3 for changing locations.
Having basic motor on-off control and steering both right beside my seat has made the use of the trolling motor on my Scout pretty effortless and almost eliminated twisting around in the seat to fiddle with the motor. Both changes were inexpensive and easy to do.
The trolling motor I'm using is Minn Kota C2 30 with 30" shaft and as mentioned above, the 30" shaft it works fine. As @LBL mentioned, there is some drag is these frameless pontoons with the seat being in contact with the water. One reason for going with a bigger motor that Minn Kota's 45lb Endura Max comes with a Digital Maximizer (built-in PWM controller) that will extend you battery life.
The last thing to consider is the battery size and type. If you're not already invested in a marine battery, you should at least consider Lithium. Battery size will depend on how you're going to use the motor. I personally don't use my motor for trolling - I find fins and/or rowing to be more effective. I use the motor to change locations a couple of times a day and for getting back to the launch. On the prairie lakes I fish it always seems like the return to launch at the end of the day is against the wind! I have found that a 35 A-hr AGM type battery is fine for my needs. I estimate I can get at least 1.5 hours at speed 3 with that battery. A larger battery is always nice as mentioned one of the Outcast videos, battery capacity and weight are directly related. My smaller battery only weighs 20 lbs and fits into the green shell box shown in the first picture. When my current battery dies, I'm certainly going to see if my budget can handle a similar sized lithium battery.
Good luck getting powered up!
Ken
View attachment 135927
View attachment 135928
View attachment 135929

This is very similar to the set up I mentioned. The PWM saves battery life. In my set up the PWM is built into the remote control. I had a manual steering set up as well but switched over to using the remote to have a free hand to control my rod.
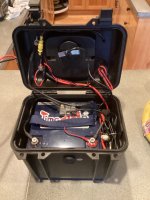
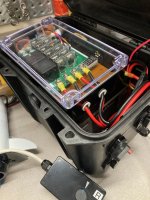
The battery I use is from Timeusb. Very good reviews and I’ve had great customer service. About $100 I’ve also installed their batteries in my travel trailer. 50 Amh fits perfectly in a Harbor Freight waterproof box with the fuse. My set up ha an external usb/usb c port, power port for my Garmin and a battery monitor that uses a shunt (highly accurate as compared to the little cigarette lighter ones).

Timeusb 12V 50Ah Lithium RV Battery Pro
Automotive Grade A Battery Cells: Capable of 4,000-15,000 deep discharge cycles and delivering up to 10 years of reliable power, 8 times longer than a lead acid battery, providing exceptional lifetime value. Internal Safe 50A BMS: Provides 100% safety guarantee and 5 types of protection, namely...
 www.timeusbpower.com
Last edited:
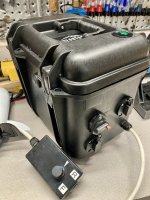
Fuse/Kill switch, plug input for charger, plug output to motor, voltmeter up top, PWM on top of LiFePO4 battery, PWM has SAE plugs so it can be bypassed if it craps out. Remote control box has a forward/off/reverse switch and speed dial. I used waterproof UR connectors for the cable splices
Last edited:
Haggis57
Steelhead
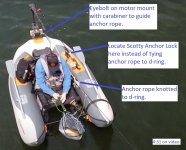
Regarding rear anchor with a motor, the screen grab below is from 4:31 mark of yet another Outcast video by Phil Rowley. Most of the drone footage is blurred but it does come into focus around 4:10 mark. Phil has put an eyebolt on his motor mount and appears to use a carabiner to guide the anchor rope off to the side of the motor. I'm not sure why he wouldn't have installed a Scotty anchor lock where he has his rear rod holder. It seems like a pretty convenient location. Some option to try out.I haven't come up with a good way to mount both the motor and a rear anchor at the same time and am open to suggestions.
This picture is a great Christmas present! Eyebolt on mount is within my technical expertise- many thanks.I'm not sure why he wouldn't have installed a Scotty anchor lock where he has his rear rod holder. It seems like a pretty convenient location. Some option to try out.
View attachment 135974
Phil probably just wants his boat facing directly downwind when on anchor.
Another option is to glue another Scotty mount with anchor lock near the motor. I glued one on the front of my Outcast for a front anchor and it holds great.
On another note, I use a clothes line retractor on all of my anchor lines. This doesn’t help pulling the anchor but they do a GREAT job of line management. No more rope laying all over the wrong place at the wrong time.
On another note, I use a clothes line retractor on all of my anchor lines. This doesn’t help pulling the anchor but they do a GREAT job of line management. No more rope laying all over the wrong place at the wrong time.
After Haggis57 kindly sent the photo of Phil Rowley's trolling motor/anchor rigging I asked Mr. Rowley himself for details. He responded immediately.
I use the Outcast anchor plate, as you have seen. I took a ¼” or 3/8” inch thread eye bolt and had my auto mechanic thread and tap the left side about halfway up. I slid on a washer and threaded a nut onto the eye bolt. With the washer and nut in place, I threaded the eye boat so it snugged up tight against the bolt, locking it in place. I then placed a small carabiner onto the eye bolt. When using an anchor, I thread the rope through the carabineer to help guide it while I am using it and to make it easier to set up and, later, remove it at the end of the day. When the anchor is retracted, I tie the rope to a D-ring so it can’t accidentally deploy when moving. I have been meaning to figure out a better way to lock the rope off than tying it to a D-ring.
I have attached an image for you to look over.
At first, I was a bit concerned the anchor might interfere with the motor. There is no issue as the anchor deploys safely behind the motor, and I never use them together. Either the anchor is deployed or the motor is running. I use a short 2 x 4 block between the motor clamp and anchor plate to separate the motor and anchor further.
I use the Outcast anchor plate, as you have seen. I took a ¼” or 3/8” inch thread eye bolt and had my auto mechanic thread and tap the left side about halfway up. I slid on a washer and threaded a nut onto the eye bolt. With the washer and nut in place, I threaded the eye boat so it snugged up tight against the bolt, locking it in place. I then placed a small carabiner onto the eye bolt. When using an anchor, I thread the rope through the carabineer to help guide it while I am using it and to make it easier to set up and, later, remove it at the end of the day. When the anchor is retracted, I tie the rope to a D-ring so it can’t accidentally deploy when moving. I have been meaning to figure out a better way to lock the rope off than tying it to a D-ring.
I have attached an image for you to look over.
At first, I was a bit concerned the anchor might interfere with the motor. There is no issue as the anchor deploys safely behind the motor, and I never use them together. Either the anchor is deployed or the motor is running. I use a short 2 x 4 block between the motor clamp and anchor plate to separate the motor and anchor further.
Attachments
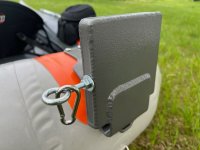
Isn’t that a lot of weight hanging off that one patch? I’d add another glue on mount. That is my plan at least. Until I get around to adding the mount I’ve deployed the anchor off of one of my side patches. Not ideal in the wind but with fins I can hold my direction ok.
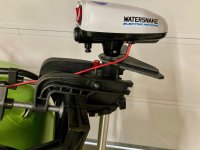
Might have to try something similar on the side of my motor mount. I've spun my prop around 180 so I'm not to sure about clearance as the line is going to be pretty close to the prop. I'm currently using a Scotty anchor lock off the side patch too. Thanks.
Haggis57
Steelhead
I'd email Outcast customer service directly and ask them - they are very responsive. And Phil is Outcast's ambassador.Isn’t that a lot of weight hanging off that one patch?
I don't think it would be a problem for that IGS patch though. Those IGS patches are thermo welded and the bonded area on the rear IGS patch is quite a big larger than the area of a glue-on patch. My 30lb thrust Minn Kota only weighs around 18 lbs and even adding the weight of the motor mount and a 10 lb anchor, the distributed load on the bonded area of the rear patch is probably only a couple of lbs/sq in. That IGS system is pretty robust. I wish they had put a rear patch on Fish Cat Scouts.
Last edited:
Haggis57
Steelhead
I think the combination of the anchor mount off the side patch in combination with Phil's eyebolt off the motor mount would be a great combination. That's kind of what I had in mind with the marked up photo.Might have to try something similar on the side of my motor mount. I've spun my prop around 180 so I'm not to sure about clearance as the line is going to be pretty close to the prop. I'm currently using a Scotty anchor lock off the side patch too. Thanks.
View attachment 136142
I have my Scotty anchor lock of the side of my homemade mount and even though the anchor line is further away, I was concerned about interference with the motor. However, as Phil noted in his comment, the key is to just never use the motor with the anchor in the water.