The Walker Bay Chronicles

MarshRat

Steelhead
Inspired by leaky waders and cramped float tubes, I scooped up a new toy on my commute home today.
IMG_9775.jpeg

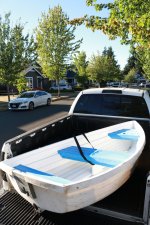
The Walker Bay 8, which weighs in at 71 lbs and slides right into the bed without any overhang. The ol’ girl has some fishing (crabbing?) battle scars, but I couldn’t argue with the FB marketplace price. Marketed as a sailing dinghy/yacht tender, the goal is to set her up pram-style with a folding seat, solid wood oars, Scotty fly rod holder and Scotty anchor puller.
IMG_0926.jpeg

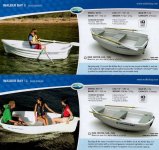
I intend to update the thread with build progress and fishing adventures. Hopefully she holds a future even Flip would be proud of.

IMG_0927.jpeg
 
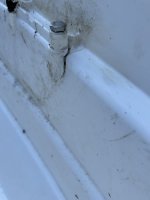
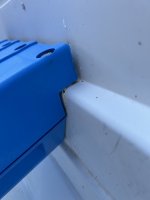
The excitement begins! In my haste, I missed a crack during pre-purchase inspection.

IMG_0937.jpeg

No hard feelings, it was mostly covered by the bolt-on middle bench. A quick wrenching reveals the full extent of the issue.

IMG_0939.jpeg

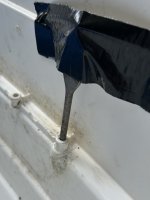
The damage is above the waterline, but definitely at a stress point, so I wanted to make an effort to mitigate further spreading. Google says most epoxies and adhesives don’t bond well to polypropylene, so I opted to slowly find the melting point and weld/fuse the gap with leverage. A drill bit provides the leverage and maintains the bolt hole.

IMG_0941.jpeg

Water test next week, gotta find some oars!
 
The excitement begins! In my haste, I missed a crack during pre-purchase inspection.

View attachment 189746

No hard feelings, it was mostly covered by the bolt-on middle bench. A quick wrenching reveals the full extent of the issue.

View attachment 189747

The damage is above the waterline, but definitely at a stress point, so I wanted to make an effort to mitigate further spreading. Google says most epoxies and adhesives don’t bond well to polypropylene, so I opted to slowly find the melting point and weld/fuse the gap with leverage. A drill bit provides the leverage and maintains the bolt hole.

View attachment 189748

Water test next week, gotta find some oars!
J-B Weld Plastiweld Epoxy should seal it. For a more robust fix - on the outer hull sand a larger area than the crack, get the thinnest poly cutting board they have at Walmart or similar, cut your pattern, use a heat gun if necessary to form any required curves, epoxy the patch on.
 
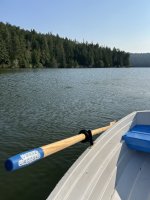
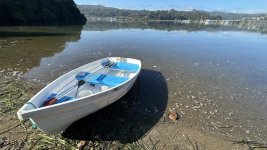
Splashed the boat this morning!

IMG_0958.jpeg

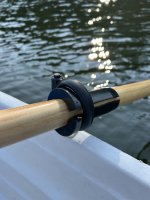
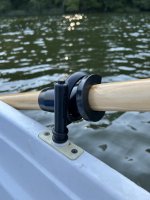
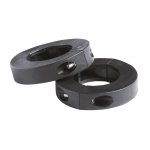
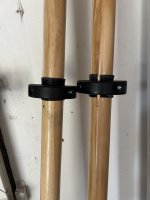
Took a few minutes to set up the oars/oar collars to an appropriate length. Don’t love these Scotty collars, advertised that you can trim to fit any oars, but it turns into a bit of a hack job as the plastic is quite stiff. No worries, this ain’t a clacka.

IMG_0955.jpeg

Conversely, the Scotty strongback oar locks are fantastic, super smooth, lightweight without feeling cheap, and perfectly fit the Walker Bay original oar sockets.

IMG_0956.jpeg

Graciously, my DIY plastic welding/melting job held (see above) with no evidence of new stress/damage at the old fracture site.

Next problem to solve is the oar lock rise. I’m 6’3” and all limbs, so it took a perfect stroke and just the right seating position on the bench to clear my knees. Will be looking into delrin or PVC shims to give me some breathing room.

IMG_0960.jpeg
 
i had one of those yakima rocket boxes that developed some cracks. we used that glue that is sold for black plastic pipe - we put down some of that sheetrock webbing tape, and then brushed the glue on. it cured up very strong. i dont know what the rocket box plastic is ?
 
Splashed the boat this morning!

View attachment 190040

Took a few minutes to set up the oars/oar collars to an appropriate length. Don’t love these Scotty collars, advertised that you can trim to fit any oars, but it turns into a bit of a hack job as the plastic is quite stiff. No worries, this ain’t a clacka.

View attachment 190041

Conversely, the Scotty strongback oar locks are fantastic, super smooth, lightweight without feeling cheap, and perfectly fit the Walker Bay original oar sockets.

View attachment 190042

Graciously, my DIY plastic welding/melting job held (see above) with no evidence of new stress/damage at the old fracture site.

Next problem to solve is the oar lock rise. I’m 6’3” and all limbs, so it took a perfect stroke and just the right seating position on the bench to clear my knees. Will be looking into delrin or PVC shims to give me some breathing room.

View attachment 190043
I have a set of the same oars and collars and had a similar experience trimming to fit. Watch out for the pins and screws backing out over time as well.
 
I have a set of the same oars and collars and had a similar experience trimming to fit. Watch out for the pins and screws backing out over time as well.
I appreciate the warning. I didn’t want to Swiss cheese the new oars with lots of Brad nails so I only used a couple on each. May end up switching directions.
 
I appreciate the warning. I didn’t want to Swiss cheese the new oars with lots of Brad nails so I only used a couple on each. May end up switching directions.
I think fewer screws would probably hold better than more nails. But even the screws are backing out a bit. I'm kind of annoyed with the collars and hardware but also annoyed that the oars aren't the same diameter as my classic Qualicum oars from Vancouver Island which likely would have fit perfectly straight out of the package, no trimming required.
 
All the Munn Lake regulars use that boat in the Winter with great success. They fit in the back of a small truck just fine. Bon Voyage..
 
Back
Top