
Navigation
Install the app
How to install the app on iOS
Follow along with the video below to see how to install our site as a web app on your home screen.
Note: This feature may not be available in some browsers.
More options
Style variation
You are using an out of date browser. It may not display this or other websites correctly.
You should upgrade or use an alternative browser.
You should upgrade or use an alternative browser.
New remodel project.
- Thread starter _WW_
- Start date


Another update.
This phase of the van is now complete. I am sure I will do more at a later date, but I want to camp in it a bit to figure out what I really need and don't. Here's a shot of the inside with the most important part - the bed. You can also see the light valences that I put in and the boards that wrap the cutout of the roof.
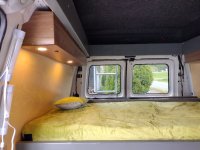
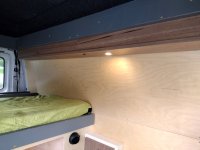
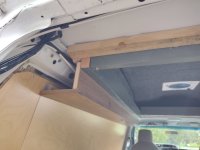
Basically to wrap the cutout I installed some 2x2s around the cutout, fastened the gray boards to that and then hung the valences from the gray board with a "nailer" on the walls. The valences are currently left open at the rear to facilitate some future additions if needed.
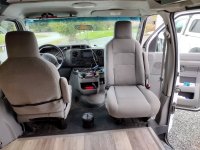
I also installed a swivel mount to the passenger seat so as to have a somewhat comfortable place to sit.
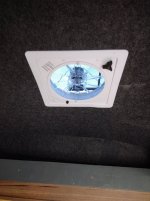
There is also a six speed reversible fan on the ceiling.
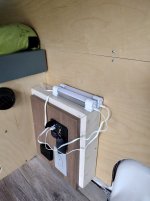
This is the control panel for the living space. Behind this panel is enough wire to move all of these devices out to the front of a cabinet if I decide to build one. Panel includes 110 vac, USB, 12v power port, and heater control panel with a remote. Also seen are two USB rechargeable lights with three different settings. They have magnets on them so I can stick them out of the way when not in use.
This phase of the van is now complete. I am sure I will do more at a later date, but I want to camp in it a bit to figure out what I really need and don't. Here's a shot of the inside with the most important part - the bed. You can also see the light valences that I put in and the boards that wrap the cutout of the roof.
Basically to wrap the cutout I installed some 2x2s around the cutout, fastened the gray boards to that and then hung the valences from the gray board with a "nailer" on the walls. The valences are currently left open at the rear to facilitate some future additions if needed.
I also installed a swivel mount to the passenger seat so as to have a somewhat comfortable place to sit.
There is also a six speed reversible fan on the ceiling.
This is the control panel for the living space. Behind this panel is enough wire to move all of these devices out to the front of a cabinet if I decide to build one. Panel includes 110 vac, USB, 12v power port, and heater control panel with a remote. Also seen are two USB rechargeable lights with three different settings. They have magnets on them so I can stick them out of the way when not in use.
Continuing to the back "garage" area of the van, are the things that make it all work.
First the photo:
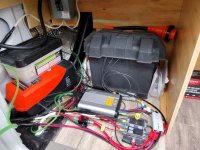
What we see here is a cased 12v 100ah LiFePO4 battery. The gray rectangular box is a Power Queen 40 amp DC to DC charger. This was chosen for a couple of reasons. It acts as a charge controller for the solar and I only had to connect it to the starting battery and not to a smart alternator. Mounted on the floor next to it is a small switchable fuse on the positive wire from the starter battery. The switch is currently open in the photo. When closed by moving the switch, the charger will take charging from the engine when it is running or from the solar panels when the engine is not running. This is automatic and requires no more action my part. When the switch is open as in the photo the house battery only receives the charge from the solar panels. It also has the capability to reverse the charging in case I run the starter battery down for some reason. The box with the clear cover is a simple 12v dc fuse box.
I also have capability for 110vac if I'm at a campground.
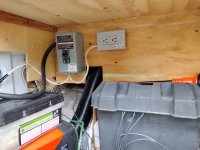
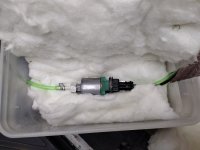
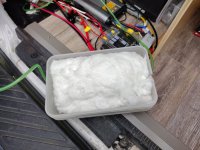
In this space is the diesel heater. There is a lot of noise (pun intended) on the internet about the noise these pumps make. I did this and I think it is going to work for me. First of all I won't be winter camping and more than likely if I'm running the heater I will be awake or about to climb out of bed.
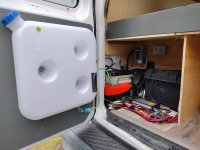
In the garage area is enough room for a solar generator, gas generator and fuel can. and just in case - a battery charger.
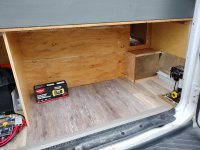
First the photo:
What we see here is a cased 12v 100ah LiFePO4 battery. The gray rectangular box is a Power Queen 40 amp DC to DC charger. This was chosen for a couple of reasons. It acts as a charge controller for the solar and I only had to connect it to the starting battery and not to a smart alternator. Mounted on the floor next to it is a small switchable fuse on the positive wire from the starter battery. The switch is currently open in the photo. When closed by moving the switch, the charger will take charging from the engine when it is running or from the solar panels when the engine is not running. This is automatic and requires no more action my part. When the switch is open as in the photo the house battery only receives the charge from the solar panels. It also has the capability to reverse the charging in case I run the starter battery down for some reason. The box with the clear cover is a simple 12v dc fuse box.
I also have capability for 110vac if I'm at a campground.
In this space is the diesel heater. There is a lot of noise (pun intended) on the internet about the noise these pumps make. I did this and I think it is going to work for me. First of all I won't be winter camping and more than likely if I'm running the heater I will be awake or about to climb out of bed.
In the garage area is enough room for a solar generator, gas generator and fuel can. and just in case - a battery charger.

Just came across this thread. Absolutely awesome. Mad skills! How much have you invested so far and what do anticipate will be the final cost? Thanks for taking us along.
I still need to tally that up. However, I managed to accrue some funding when I sold off the parts of the van that I didn't need.Just came across this thread. Absolutely awesome. Mad skills! How much have you invested so far and what do anticipate will be the final cost? Thanks for taking us along.
Lumber rack - $450
Interior Adrian steel cabinets - $900
Suzuki 4hp two stroke - $160
So - $1510.00. I don't think I've got that much in it yet. All of the wood was in my inventory from past business projects.
I tally it up here soon and provide links to the products I've used.
So I have done a tally of costs. $2388.30
Minus the $1510.00 from my van parts sales = $847.30 Plus a $119 for the flooring from Lowes so $997.30 out of pocket.
Getting it finished was a bit of a chore because I currently have very little use of my right hand. (Seeing the surgeon next Monday)
Attached is a PDF file that list the components used. The costs are what my order tallies were from Amazon. Sometime several things were ordered together so the cost for that order is listed next to the top item.
Minus the $1510.00 from my van parts sales = $847.30 Plus a $119 for the flooring from Lowes so $997.30 out of pocket.
Getting it finished was a bit of a chore because I currently have very little use of my right hand. (Seeing the surgeon next Monday)
Attached is a PDF file that list the components used. The costs are what my order tallies were from Amazon. Sometime several things were ordered together so the cost for that order is listed next to the top item.
Attachments
Carpentry/Homebuilding was my occupation. Having owned a few different used RV trailers I learned a lot of maintenance and 12v knowledge working on them. I also spent 4 years as a maintenance mechanic at a machine shop. I also have the general attitude of "How hard can it be?"Outstanding work! I'm wondering what trade you're in, to have all these different skills.

Very good! Very! Nice heater install...great fan install, that roof removal musta' puckered ya....I had a hard enough time cutting out for the fan...eek! This is very, very well done. Congrats...I hope you get as much pleasure out of yours as I have out of ours!
Guy
Guy