Alternative Parachute Technique - SBS

Mike Cline

Life of the Party
Forum Supporter
1BC336DD-901F-4FA8-82DD-2598F282C66A.jpeg
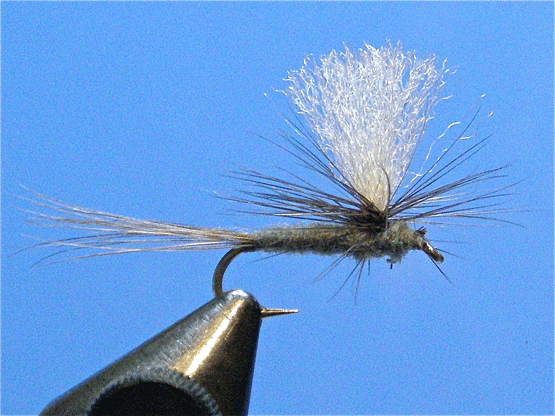
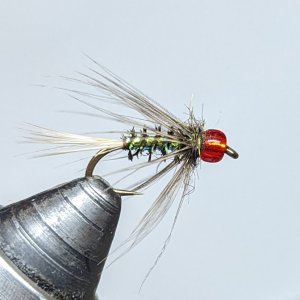
Despite having tied flies for decades, my skills at tying parachutes was marginal at best. No matter how hard I tried, wobbly posts, messy profiles and captured hackle fibers resulted in overall sloppy flies. As the winter of 2022/23 set in here in Montana, I resolved to improve my parachute tying skills so I could produce some decent parachute style flies. Parachutes are used for everything from hoppers down to tiny midges. The Parachute Adams, Purple Haze and Klinkhammer emergers are staple and effective parachute patterns that I just had to get right.

After watching hours and hours of videos on the parachute tying technique as well as reviewing all the literature I could find, I came to a three part, alternative tying solution that helps me tie some respectable parachute style flies. The technique works best with fine 10/0 to 16/0 threads and a rotary vice. So far I’ve made this work down to #22 midges.

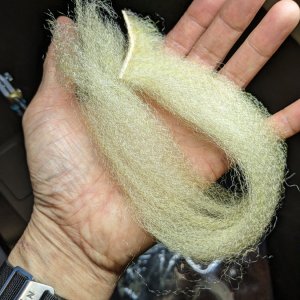
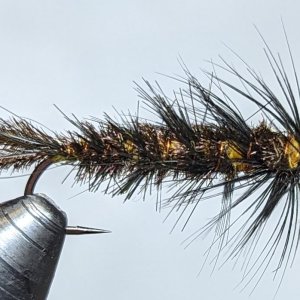
Part 1. Tying the post. I always found it extremely tedious trying to wrap thread around a wobbly clump of parapost or other material to create a stable, firm post. Rarely was I able to create a post stiff enough to handle winding hackle without serious flaws or missteps. The solution adopted actually is rather simple. Using any pliable, translucent fiber—I prefer Frizz Fiber, but EP fibers, SF Blend, parapost, Zelon or similar will work—I take a small 2-2.5 inch clump of fibers and secure to the hook shank with 3-5 tight thread a wraps at the middle of the clump. Both ends of the clump are then twisted as tight as possible to create a thin post. While holding the twisted fibers apply a sparingly amount of UV resin to the first 1/8” - 5/16” of the post and cure. This creates a solid post, secure to the hook shank.
88D0340E-F052-4B3F-9E9C-0A65C4543271.jpeg
Part 2. Tying the body. Another problem I had with more traditional parachute techniques was finishing the front part of the thorax and then continuing thread use back to the post to tie in the hackle. To solve that, depending on pattern, I tie in a tail, trailing shuck, body and thorax using appropriate materials to create the desired profile. Build the profile all the way to the hook eye and secure with half hitches or whip finish just like a normal fly and detach the thread.
B36AFEC5-6200-4B50-ABE9-15EDDA8804A7.jpeg
Part 3. Tying the Parachute. Traditional parachute tying secures a hackle upwards along the post with thread wraps and winds the hackle down the post. In my experience, wobbly posts and twisted hackle usually resulted in sloppy hackle. Finishing the fly was also an issue as trying to secure the hackle tip at the bottom of the post usually resulted in trapped fibers below the body and thorax. To solve this, I take advantage of my rotary vice. Rotate the vice jaws 90 degrees to the right and the entire vice 90 degrees to the right so the post is now horizontal and parallel to the tying bench. Start a thread wrap on the post just like you’d start a thread wrap on a hook shank. Cover the entire post with thread wraps leaving the thread at the base of the post. Tie in your hackle shinny side up with the feather facing down instead of up. Leave your thread at the base of the post. Apply a moderate amount of head cement to the thread wraps making sure there is cement at the base of the post. Wind the hackle once or twice to the left side of the thread. Then wind the hackle to the right of the thread along the post 2 or 3 turns then back to the base of the post. Make two wraps to the left of the thread and secure the hackle tip with two thread wraps taking care not to capture any fibers below the body. Trim the hackle tip. Finish the fly by making a double half hitch around the base of the post. The half hitch loop should be taken to the bottom of the fly and pulled tight. The head cement applied to the post will secure this double half hitch. This generally avoids any capture of hackle fibers below the body and thorax. Trim the post to the desired length.
0E1D498D-896A-4ECB-BEBF-193984A79FEE.jpeg
AF4DDF2D-3BD0-41CC-8C03-01D9E1EB487E.jpeg
F0438279-D49D-45E9-90D6-D0FA7BEFD578.jpeg
8815A662-E836-4AF2-B25D-3B718F3B66B1.jpegA3F9806A-2744-49EA-9117-E2974C831904.jpeg7441A13D-5F70-40B8-BA60-6AD2FD34C5AF.jpeg98B670C0-FA12-4AC6-ADBD-DC4BA49C2342.jpeg
 
Last edited:
Over the last few months, I've been tying 100s of parachute patterns in preparation for a couple of upcoming fly-tying shows. Needless to say, practice has a way of improving things. Here's a couple additional tips for my alternative parachute technique.

Post material: In addition to the post materials, I mentioned above, three additional materials have been successfully used to create nice, tight posts with the UV resin technique. Just H20 Crystal Flesh rivals Frizz Fiber in absorbing UV resin and creating tight posts. Floating yarn and McFlylon can also create posts using UV resin

Creating the post: The only change here is the sequence. Once the post material is attached to the hook, apply the UV resin BEFORE twisting the post. This allows for better coverage of resin on the interior fibers of the post. Additionally, once the post is cured, apply and cure a tiny bit of resin on the thread wraps on the bottom of the hook shank. This helps to keep the post secure, especially on very small flies.


P2080409.JPG

Facilitating Downwing Type Flies: All types of patterns can be tied with parachute hackle. In particular Trude Style, Caddis, Hopper and Stonefly patterns with down wings are suitable for parachute hackle. However, hackle ribbing on the body or a hair down wing can interfere with wrapping the parachute hackle. This easily solved by applying a strip of tape over the wing/hackle to secure it out of the path of the parachute hackle.
P2080410.JPG

P2080411.JPG
P2080412.JPG
 
Great topic. Parachutes are some fairly advanced and tricky stuff before you figure things out.

I finally learned a trick last year to address the captured hackle fibers problem, which frustatingly occurs most often when trying to whip finish under the hackles. Turns out the solution is to skip the whip finish step. Just put a drop of super glue on your bobbin and run it parallel to your thread after you finish securing the hackles, then cut your thread. Holds up surprisingly well, and no more unsightly trapped fibers.
 
All good stuff and thank you for sharing. Great photos too.

Lately I've been using the technique I learned from Tom Baltz on his Paranymph. Tom ties his parachutes a lot like the usual (messy) style, but winds the hackle counter-clockwise down the post. The hackle fibers easily fold out of the way when you whip finish. He even winds a little more dubbing on the hook without trapping fibers.

When I first watch him do this this I thought it was magic 🙃
 
This post was extremely helpful, I've tried tying standard dry files and parachutes, using a lot of techniques I've seen on YouTube, and there's one thing I've noticed that I'm confused about. Occasionally, I've seen some tiers completely peel off the fibers on one side of the hackle, and some don't, or at least I don't see them do it in their videos. I can see how this would make for a cleaner wrap, but it's not something I see mentioned in a lot of instructions. Is this something everyone does?
 
This post was extremely helpful, I've tried tying standard dry files and parachutes, using a lot of techniques I've seen on YouTube, and there's one thing I've noticed that I'm confused about. Occasionally, I've seen some tiers completely peel off the fibers on one side of the hackle, and some don't, or at least I don't see them do it in their videos. I can see how this would make for a cleaner wrap, but it's not something I see mentioned in a lot of instructions. Is this something everyone does?
I think the operative technique here is to NOT trap hackle fibers when the feather is attached to the post. When the hackle stem is first wrapped it should be clear of hackle fibers. Whether that’s done by stripping one side of the hackle or not. If the hackle fibers are trapped by the first turn around the post, the first fibers will point down. If you can start the parachute around the post using the stem only, when you reach the hackle fibers they will splay parallel to the post, not trapped below it,
 
Tie in your hackle shinny side up with the feather facing down instead of up.
Hi Mike,

I logged on so that I could reply.

That's an excellent explanation of how to tie a parachute fly.

However, I do have a comment on tying in the hackle shiny side up.

I assume you do this because you consider the parachute to be a dry fly and by tying in the hackle this way, the barbs bend down towards the water and the fly rides higher.

The hackle on a parachute fly is ABOVE the fly body and fly is designed to sit IN the film and NOT ON THE FILM. Therefore, the parachute fly NOT a dry fly.

The reason the parachute is the most popular dry fly sold in the USA is that it is such an effective fly. The reason it is an effective fly is that it is an EMERGER because it sits in the film.

Tying the hackle so they bend AWAY from the water makes the fly imitate an earlier and therefore, more vulnerable emerger.

My best friend is Gary Borger and he taught me how to cast and fly fish. I edited his book "Fishing the Film".


Here's my copy of Designing Trout Flies


Gary Borger published an article in Fly Fisherman Magazine titled, "Film Flies - The Five Stages of Insect Emergence and The Best Flies to Imitate Them"

Unfortunately, the article is no longer available online.

This what Gary wrote about where the parachute fly fits:

"TStage 3. The insect pulls its head out of the shuck, followed almost immediately by the legs. At this point it enters stage 3, which is matched perfectly by the universal emerger: a Parachute Adams (or other fly with an upright parachute post such as the Klinkhåmer). [See “The Klinkhåmer Special” in the Dec. 2006 issue for more details. The Editor.]

All three of the surface-emerging insect groups look the same during this stage. That’s why the Parachute Adams is the world’s number 1 dry fly: it matches any mayfly, caddis, or midge in stage 3.

Most fly fishers think of the Parachute Adams as an adult dun imitation, but in reality it is an emerger
. In stage 3 the nymphal or pupal body is just under the film and the legs are spread out on the surface to support the body. The body sticks almost straight up, with the wings plastered tightly along the top of the thorax as they continue pulling up and out of the wing pads.

Light reflecting off the upright body with the wings plastered tight along the top, gives the emerging insect a shining, light-colored look.

Still not convinced? Toss a Parachute Adams in a glass of water and view its position."


A more complete explanation is available in Gary's Book, Fishing the Film

And you can read Gary's post about the parachute on his Blog.

 
Last edited:
@Silvercreek Actually I tie both ways, and agree with the Borger treatment. If I was writing the SBS today, it would incorporate a lot of experience I’ve been through with parachutes over the last couple of years. Always learning.
 
Thank's for the follow up reply.

Another talking point about parachutes is hackle selection.

You can get by with cheaper hackle and personally, I save quite a bit of money by using saddle hackle rather than necks. Saddles are cheaper and the feather are longer so you can tied more flies with a hackle from a saddle than a neck.

Plus with parachute flies, you can hackle that is not the perfect size. It can be a size larger or smaller and still work.

I use the lowest pro grade hackle which can be bought at some fly shops.

There was a cost comparison done by flyfishfood.com many years ago that is longer on-line. But it shows the cost savings by using cheap hackle. Although current hackle costs are higher, I imagine the relative cost savings using pro grade hackle would still translate at current prices.


Another point I would like to make is that hackle graders are not perfect. They make mistakes and under grade or over grade hackle. So open up the hackle sleeves and actually examine the hackle. Do not make the mistake of looking at the hackle under artificial light. Rather take it to a window and look at it in the natural light that is coming through the window.

Any crash course has to be hands on. So grading necks is a matter of actually taking the necks out of the package and inspecting them for barb length, barb density, and whether the stems will twist when wrapped, etc.

I always take a white lined 3x5 index card with me. I use white unlined side as a background when I spread the hackle feather to gauge the hackle length and quality. A white background really helps as does a pair of reading glasses for magnification. It helps me see any subtle irregularity in the hackle like curved tips.

The lined side of the 3x5 card can be used by beginners for measuring hackle sizes by placing marker vertical lines on the horizontal lines of the card for the hooks you actually use. Place the hooks on the horizontal lines on the card and mark and label the sizes. Then you will have a hook gauge that is customized for your own hooks.

You can also use this gauge for choosing which hackle to pull of the neck or saddle to use when tying.

Without removing the feather from the neck, bend individual feathers into an arc and compare the length of the individual hackle fibers against the 3x5” white card or home made hackle gauge. I don’t need a gauge but a beginner should use one. Measure the feathers at the top (narrowest) portion of the neck to see what the smallest fly can be tied. Also estimate the number of those feathers on the the neck.

Better hackles have minimal webbing at the base. You don't want to use that portion of the hackle which has over 20-25% of its length taken up by webbing so only that portion of the feather that has less than this is useable. So grade the neck by the length of the USEABLE hackle and not the gross feather length.

Note also the density of hackle fibers per length of feather. Denser hackle requires fewer turns to get the same floatation. Also look at the tips of the individual fibers. They should not be hooked but straight and sharp. Gauge the stiffness of the hackle by pushing against your lips which are more sensitive than your fingers. Stiffer is better. Try to get some sense of whether the hackle stem will twist when wound around a hook. The longer feathers will give you a sense of this when bent into an arc.

Check the coloration of the neck. It should be consistent without mottling if possible. Look at the feathers underneath the surface feathers to see if there is color variation. Another part is knowing what the color looks like on the cape or saddle and what it looks like on the hook. Because the feathers are layered, the colors are darker on the skin. Pay attention when you tie to the color on the skin and the color on the hook. Then pay attention to the color on the skin and how they actual feather looks like when separated and bent when you are grading the hackle.

Learn by handling necks and saddles so you know what the grades are and how they differ. It is experience. For me, I look for necks and saddles that are under graded. I want a cheaper neck or saddle that is better than it's price and grade. I mainly buy prograde necks and saddles because I know what I am looking for.

For example, if I need hackle for a size 14 dry fly (the most popular size) I look for a saddle that has lots of size 14's and relatively fewer 12s and 16s. For example, there will be pro grade necks with more 16 than 14s and I do not buy those. The ability bend a saddle and quickly tell the dominant size allows me to go through a bunch and pick the best one for me.
 
Last edited:
I am probably not as sophisticated about hackle selection as is @Silvercreek. I have a lot of saddle fragments, a lot of Collins neck/saddle combos and a lot of unbranded hackle. Whatever I use, the flies seem to work fine. Over the years I’ve probably accumulated three to four times the amount of hackle I’ll ever use. I do agree that using a long saddle hackle for the parachute is easier than a cape hackle, but both work.
 
Good morning and thanks to Mike and Henry and everyone for sharing.

I especially liked this tidbit from Henry: "Tying the hackle so they bend AWAY from the water makes the fly imitate an earlier and therefore, more vulnerable emerger."

Best, WR
 
Back
Top