How about RS Starter to keep it mysterious??I never named my starter. If I had to pick a name, maybe Sloan after Robin Sloan who wrote a fun book titled "Sourdough."

Follow along with the video below to see how to install our site as a web app on your home screen.
Note: This feature may not be available in some browsers.
How about RS Starter to keep it mysterious??I never named my starter. If I had to pick a name, maybe Sloan after Robin Sloan who wrote a fun book titled "Sourdough."
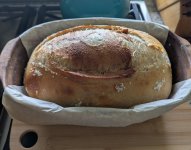
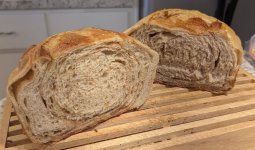
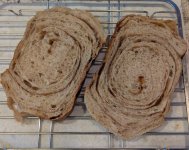
Where's the recipe from? I almost exclusively use the King Arthur site!Cinnamon brown sugar sourdough. My wife likes soft bread with a soft crust, so I've been working on that.
View attachment 146653
View attachment 146655View attachment 146654

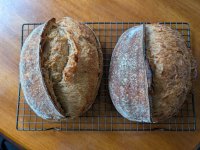
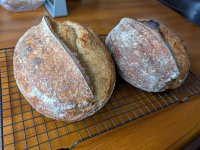
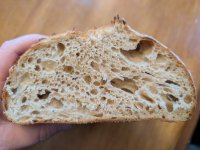

I used the same "easy everyday sourdough" recipe that I posted above. After mixing in the Cambro tub (no kneading, no stretch and folds), I let it proof overnight in the tub, about doubling in size.Where's the recipe from? I almost exclusively use the King Arthur site!

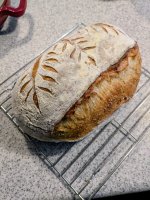
Been there! Looks pretty regardless of your struggles. For my typical country style loaves, I don't mind a long slow counter proof as my house is always on the cool side (65-67 except for during the summer). Yesterday, from mix to going in the fridge was 8.5 hours and that's with 20% inoculation.Figuring out that this pursuit is not easy. Lots of minor variables that must be controlled and the effects anticipated. This is my fourth loaf and in an effort to get the bulk proofing before shaping done in my cold house I have been putting the dough in my bathroom which has a heated tile floor and stays around 80. I learned yesterday that I really need to monitor the rise closely as this batch was left in the warmth too long and was over proofed. The dough was really wet and didn't want to leave the bowl in one piece. Having gotten that far I went ahead with the process, shaped as well as possible, into the banneton overnight in the fridge and baked this morning. I read something yesterday that was a bit of a lightbulb moment for me. I'm sure the accomplished bakers here are aware of this but I was not. The designs cut with a lame were done with a purpose years ago. Many villages did all their bread baking in a communal oven and the artistic scoring was the way individual families could identify their own loaves among the others in the oven. Neat stuff to me.
View attachment 147532

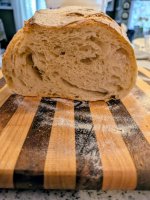
To me it looks a touch over, but not by much, that irregular crumb is desired by a lot of people. Is it sticky/gummy inside?So this is what it looks like inside. To you bread gurus does the irregular crumb with large pockets support my belief that it was over proofed. Tastes great and marvelous texture and in spite of being butt ugly. Made this loaf with alder smoked salt which adds a pleasant subtle touch.
View attachment 147534
It's pleasantly chewy but not what I would call gummy. If I squeeze the inside it does not stick to my fingers and bounces back immediately. I did cut the baking time without the DO top down a little as the color of the crust was what I was looking for and something I read who knows where in one of the innertube bread rabbit holes said that was the approach to take. Perhaps it could have been in a little longer but that wouldn't have affected the crumb I don't think. The crust is not as "solid" or thick as previous loaves however.To me it looks a touch over, but not by much, that irregular crumb is desired by a lot of people. Is it sticky/gummy inside?
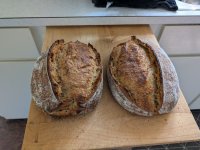
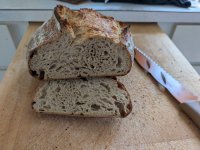
Beautiful
Now that's just not fair.

It's not a contest! Unless it's like the Caucus Race, where everybody has won, and all must have prizes.Now that's just not fair.

 www.alice-in-wonderland.net


It took quite some time for them to consistently look like that....there were a lot of edible but ugly loavesNow that's just not fair.
I tried this yesterday it had the taste was wanting but I made them too thick. I will be back in the kitchen soon.No sourdough. I used this NYT recipe (substituting buttermilk powder for buttermilk and mixing the powder in first with the dry ingredients):
Small-Batch Buttermilk Biscuits
By Erin Jeanne McDowell
Small-Batch Buttermilk Biscuits
Julia Gartland for The New York Times (Photography and Styling)
Total Time
45 minutes, plus chilling
Here’s a recipe for when you want towering, fluffy biscuits, but don’t want a large batch. You can use pretty much any ovenproof dish — a baking sheet, a square or round cake pan, or even a skillet — but be sure to butter the pan beforehand. If you like things a little less seasoned, reduce the salt to ½ teaspoon, and if you use salted butter in the dough, reduce the salt to ¼ teaspoon. Fun tip: Bake these beauties in the toaster oven by following the same temperature and timing guidance as you would when baking in a standard oven. Serve them warm.
Featured in: Big Love for Small-Batch Cooking
Ingredients
Yield:
4 biscuits
2cups/255 grams all-purpose flour
1tablespoon baking powder
1teaspoon kosher salt
6tablespoons cold unsalted butter, cut into ½-inch cubes, plus room temperature butter for greasing the pan
¾cup/180 milliliters cold buttermilk, plus more as needed
1large egg
Preparation
Step 1
In a medium bowl, whisk the flour, baking powder and salt to combine. Add the cold cubed butter, and toss until each cube is well coated with flour. Using your hands or a pastry cutter, cut the butter into the flour until the mixture resembles a coarse meal.
Step 2
Make a well in the center of the bowl, and pour in the buttermilk. Use your hands or a silicone spatula to mix the ingredients together until they form a homogenous dough. (It will look quite shaggy.) If the dough is not coming together, add more buttermilk by tablespoons.
Step 3
Wrap the dough in plastic wrap and refrigerate for 30 minutes. Toward the end of chilling, heat the oven to 400 degrees.
Step 4
Butter a 9-inch square baking pan, a 9-inch round cake pan, an oven-safe skillet or a baking sheet.
Step 5
On a lightly floured surface and using floured hands, pat the dough into a rectangle ½-inch thick. Fold the dough in quarters. Using floured hands, pat the dough out again to a square about 1¼-inch thick.
Step 6
Cut the square of biscuit dough into four even pieces. Transfer the biscuits to the prepared pan in a cluster, with about ½ inch of space between each biscuit.
Step 7
In a small bowl, whisk the egg with 1 tablespoon water. Brush the egg wash over the surface of the biscuits, and bake until deeply golden brown on top, 25 to 30 minutes. Cool at least 10 minutes before carefully separating and serving.