What's in your (PIZZA) oven?

Evan B

Bobber Downey Jr.
Staff member
Admin
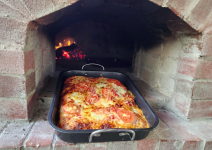
We've had a few threads about building pizza ovens and which pizza oven to buy. How about a thread about the pizzas you're making in whatever oven it is you have?

Just pizzas: Your methods, your ingredients, show off what you made. Share some tips.

Seems there's plenty of enthusiasts here.

I have plans for a few pizza nights in the near future, but I'll make a few posts here soon about some of my creations from the last year since I finished building my oven.

1737835004143.png
 
Menu for my kids 1st birthday party. Yes the crust is a bit burnt, I made 16 pizzas that day and still drank then.

We’ve had a big pizza party every year for her birthday including her actual birth day. We had 30 or so people over the 5 days after she was born and had a big ole time.

2019_TMcSweeney_Bertday-2019-27.jpeg
 
A timely question since Saturday is usually pizza day here at the Rocking K. Finding good ingredients is a challenge on the Frozen Tundra with the nearest supermarkets being 45 miles away but while in town last week I found some good stuff. All new to me was some specialty pepperoni, some deli mozzarella and a small bottle of made in Italy sauce. Upon tasting the sauce I didn't think it was anything special but it made a very good pizza. The usual seasonings of Frontier Co-OP Pizza Seasoning, which is heavy in fennel,was combined with better than average Gustus Vitae granulated garlic and Aleppo pepper. The mozz was reinforced with some Fontina cheese and the whole thing topped with a few red onions. The dough was started on Thursday morning and baked on Saturday afternoon and was just superb.

I have started buying a much higher grade of olive oil and after tasting it, I took my old stuff and poured it in the tank of my diesel tractor. The pie was built in a 12'' cast iron pan with a generous amount of olive oil and baked in a 550 degree oven and came out damned near perfect. I get to eat the second half today during the ball game.

Next month I am making the 900 mile round trip drive to the Super Bowl party and have been invited to make pizza the Saturday before but declined the offer. Since I am the guest I want to try their pizzas, when they come to my place I'll build. You always learn something when you watch someone else.
 
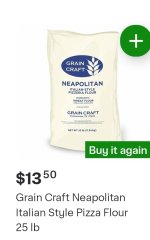
One pleasant surprise I had early on was how good this flour actually is. I had started with the expensive Italian and other premium flours, then decided to take a chance on this stuff from Cash n Carry (or whatever it is they call themselves this week). It has been every bit as good as the stuff that costs many multiples more, plus comes in a big bag so don't need to constantly stock back up.

1000006645.jpg
 
I’m new to this.

What does letting the dough sit for a couple days do?

And, is this done with any dough recipe? Or are you all using a special sourdough-like recipe?
 
I’m new to this.

What does letting the dough sit for a couple days do?

And, is this done with any dough recipe? Or are you all using a special sourdough-like recipe?
What's it do? In short, everything. I have experimented with some doughs that are made same day or even one day, and the final results are just not great. They tend to be more dense, sometimes almost stale texture, and not as tasty.

Letting the dough cold ferment will give you a much better texture and flavor development. I'm on my phone currently so am not going to look up the exact terms on the process happening, but your end result is a much airier, wonderfully textured crust that bakes better, tastes better, and is more what you'd expect from a high end pizza establishment vs the freezer at the 7-11.

I can post the recipe I use later. I don't use a sourdough starter, just dry yeast. Then once you get used to the dough and how it turns out, you can start experimenting with hydration levels to fine-tune it.
 
Last edited:
I’m new to this.

What does letting the dough sit for a couple days do?

And, is this done with any dough recipe? Or are you all using a special sourdough-like recipe?
Ok so here's the jist of the recipe I use. I have actually put together a spreadsheet calculator so I can adjust the recipe as needed based on how much I'm making. That way I can calculate how much to make based on the size of the dough balls I need.

This is the recipe I use for my Sicilian/Detroit style pizzas, but I've found it makes for awesome neopolitan-ish pizzas as well. I often will make a bit extra so that I can make a few regular pizzas in addition to my deep dish sicilians. I've basically abandoned my old neoplitan recipe and just go with this now. Not that they're worlds apart different.

First: I do make a Poolish (starter). It's a 100% hydration starter (equal parts in weight water and flour) with dry yeast. I make it a day in advance and it gets added to the recipe. You don't NEED a poolish, but it does give better end results and is easy enough that there's no reason not to. If you need poolish specifics, I imagine many resources online show how to do it. Or I can make another post on here about it.

Makes 39oz total (my neopolitan dough balls are roughly 10oz (280g))

3g (1tsp) active dry yeast
90g (1/4c plus 2TBSP) warm water
578g (4.5c) pizza flour
13g (1.5tbsp) diastatic malt
116g poolish (see description above)
296g (1.25c) ice water
13g fine sea salt
7g extra virgin olice oil

1. start the dry yeast in a small bowl with the warm water
2. combine flour and malt in mixer bowl with dough hook
3. while running mixer, pour in most of the ice water. save a bit of it to wash out the yeast you just started.
4. Pour in said yeast. Use that bit of water to rinse it out and dump in the mixer bowl.
5. stop the mixer and pull the ball off to kind of reset it (it'll stick to the hook and just kind of bang around at this point)
6. restart it and add all of the poolish
7. add the salt and mix some more
8. stop it, reset the ball and scrape the sides. Then add the olive oil for another round of mixing for about a minute.

1b. Put the ball on a pan lightly greased with olive oil. use wet hands or you're gonna have a bad time.
2b. Stretch and fold the dough (if you don't know how, I suggest looking it up. it'd be another long post explaining)
3b. Cover the dough ball with a damp towel and let it sit for 20mins.
4b. Remove the dough from the pan, weigh it, then divide up in to your pizza dough balls. (again, mine are roughly 280g for a typical pizza).
5b. Stretch and fold the dough balls. Make sure the folded side is nicely pinched and sealed, and put that side down in the container.
6b. Place in an airtight, lightly oiled container, and keep in the fridge for 48-72hrs.
7b. Remove roughly 1-2hrs before stretching and making in to a pizza.

 
That is a very good price for 25# of pizza flour! I wish I had access to that. I have been buying the Kirkland brand unbleached flour in the 20# two packs and using it for general purpose but I find that it makes good bread and decent pizza dough. It is 11.5% protein, a little lower than King Arthur bread flour but about 1% higher than the average all purpose stuff. A good all around flour at a decent cost.
Ok so here's the jist of the recipe I use. I have actually put together a spreadsheet calculator so I can adjust the recipe as needed based on how much I'm making. That way I can calculate how much to make based on the size of the dough balls I need.

This is the recipe I use for my Sicilian/Detroit style pizzas, but I've found it makes for awesome neopolitan-ish pizzas as well. I often will make a bit extra so that I can make a few regular pizzas in addition to my deep dish sicilians. I've basically abandoned my old neoplitan recipe and just go with this now. Not that they're worlds apart different.

First: I do make a Poolish (starter). It's a 100% hydration starter (equal parts in weight water and flour) with dry yeast. I make it a day in advance and it gets added to the recipe. You don't NEED a poolish, but it does give better end results and is easy enough that there's no reason not to. If you need poolish specifics, I imagine many resources online show how to do it. Or I can make another post on here about it.

Makes 39oz total (my neopolitan dough balls are roughly 10oz (280g))

3g (1tsp) active dry yeast
90g (1/4c plus 2TBSP) warm water
578g (4.5c) pizza flour
13g (1.5tbsp) diastatic malt
116g poolish (see description above)
296g (1.25c) ice water
13g fine sea salt
7g extra virgin olice oil

1. start the dry yeast in a small bowl with the warm water
2. combine flour and malt in mixer bowl with dough hook
3. while running mixer, pour in most of the ice water. save a bit of it to wash out the yeast you just started.
4. Pour in said yeast. Use that bit of water to rinse it out and dump in the mixer bowl.
5. stop the mixer and pull the ball off to kind of reset it (it'll stick to the hook and just kind of bang around at this point)
6. restart it and add all of the poolish
7. add the salt and mix some more
8. stop it, reset the ball and scrape the sides. Then add the olive oil for another round of mixing for about a minute.

1b. Put the ball on a pan lightly greased with olive oil. use wet hands or you're gonna have a bad time.
2b. Stretch and fold the dough (if you don't know how, I suggest looking it up. it'd be another long post explaining)
3b. Cover the dough ball with a damp towel and let it sit for 20mins.
4b. Remove the dough from the pan, weigh it, then divide up in to your pizza dough balls. (again, mine are roughly 280g for a typical pizza).
5b. Stretch and fold the dough balls. Make sure the folded side is nicely pinched and sealed, and put that side down in the container.
6b. Place in an airtight, lightly oiled container, and keep in the fridge for 48-72hrs.
7b. Remove roughly 1-2hrs before stretching and making in to a pizza.
My method is similar to Evan's but I don't use a poolish and usually don't use my stand mixer. If you don't have a stand mixer, don't fret, bread was made for thousands of years before the invention of the stand mixer. Instead I use the no-knead method which involves nothing more than combining all of the ingredients into a shaggy damp ball then covering it and letting it rest for at least 36-48 hours in the fridge. Take it out a few hours before baking and let it come to room temp. At that point I like to do a stretch and fold and a final rise before shaping the dough. One tip that I can offer is to cover the bowl with plastic wrap before placing in the refrigerator and spray the underside of the plastic with water. This provides a moist environment for the dough and prevents some surface drying that can occur otherwise.

Another thing I would encourage is the use of a digital scale for all of your ingredients. Flour is especially sensitive to humidity and should be kept tightly sealed to avoid excessive moisture absorption. Here on the dry side I am looking at 21% humidity in the house right now, on the wet side your humidity might be considerably more. Weigh everything and make notes, you want to achieve consistency with repeatable results and have a basis for minor adjustments as needed.

Discovering that you can make a pizza better than 90% of the stuff you can buy is a joy worth the effort.
 
Holy Schmoley! You guys are dialed in! Thanks for sharing.

Prior to jumping in to this thread I was feeling pretty smug making my own dough in our bread machine….following the recipe that came in the owner’s manual 🙃. Now I’m excited to give this a go.
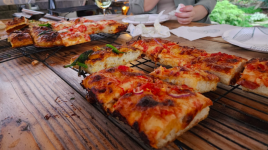
It’s too late for tonight’s pizza making but it will be on next week’s menu 👍

Fun!

and Ive…you mentioned a stone or something to bake the pizza on in a regular oven. What do you use?
 
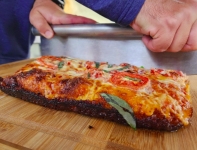
We have a few pizza places near me that inspired me to learn Detroit/Sicilian style. They're essentially the same thing, but Detroit uses Wisconsin Brick Cheese to be "authentic." And "authentic" Sicilian style has origins in New York, not Sicily. So it's all kinds of confusing, I know.

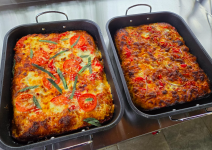
This has become our go-to, especially when entertaining more people. I'm mostly bringing this up because this is a great style to learn for those using kitchen ovens. I use my brick oven, but you can get just as good results in the kitchen. I know @mcswny uses his oven in the kitchen for these. All you need are some pans and you're good to go.

1737922888765.png

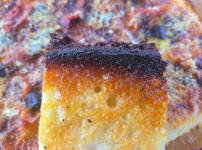
The real appeal to these, despite the super tasty foccacia-style crust, is the cheesy crust edges. You pile low-moisture mozzarella along the sides, and it crisps up in to the most delicious of pizza crusts.

1737923045361.png
1737922999328.png

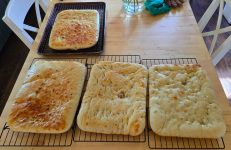
Using the recipe I put a few posts ago (I use 23oz or 650g dough balls for my pans which are 10x14in), you stretch the dough out into the oiled up pans and let it rest and rise for a few hours. Then you parbake it. I typically parbake in the morning/around lunch time to have things ready for dinner. I like to let them cool on some racks before returning to the pans and building the toppings up.

1737923167909.png

1737923244246.png
 
Last edited:
Very cool. I had no idea pizza making was so involved. Thanks again for sharing. FWIW I’m gonna try some extra cheese to my machine made dough….we’ll see how that zazzes things up 👍

Also, I had to look up parbake. Are you doing the rapid freeze? Orj simply letting it cool on the racks?
 
Last edited:
Very cool. I had no idea pizza making was so involved. Thanks again for sharing. FWIW I’m gonna try some extra cheese to my machine made dough….we’ll see how that zazzes things up 👍
Like... Adding cheese into the dough?
 
No…piling it up on the crust.

Also I looked up parbake. Are you freezing? Or simply rack cooling ?
 
No…piling it up on the crust.

Also I looked up parbake. Are you freezing? Or simply rack cooling ?
Oh OK 😂 misunderstood.

I'm just pre baking the dough, cooling it then building the pizzas and doing the final bake. I imagine you could potentially freeze them as well but I've never done that so can't say for sure how it'd go.

I only parbake the Sicilian style crusts. My neopolitan pizzas are all done the standard way.
 
  • Like
Reactions: M_D
Back
Top