
Divad
Whitefish
*Review of the blank is below and after the first set of images I speak to the KR Concept guide build process. In case this thread is found by anyone curious about that guide setup, how to setup this blank or wanting to expand knowledge.*
All Purpose Fast Glass 710 Blank Review
After hearing good things about these lightweight Fast Glass offerings from NFC I wanted to try one out myself. Upon handling the 744 at the NFC facility I desired something with more of the fiberglass flex, feedback and feel given the fish I will be fighting are 4-8lbs with ~1/2oz lures. The 744 is a good jump in stiffness compared to the 742 and again from 742 to 710, of which the 710 felt awesome when I first gave it a wiggle. I added a 6” section as an oversleeve to help get more from the blank to total 7ft 8in. The rod doesn’t oscillate or bounce after a cast while providing plenty of flex and power. The goal was a blank that could throw 1/3 to 2/3oz spoons/spinners, targeting steelhead and coho (salt and freshwater), where distance will be a priority. And so far, the rod excels in this aspect! I can still feel the spoon wobble at 1/3 ounce and the blank really shines in the 1/3 to 1/2oz region. On a 2/5oz spoon, 140ft is easily doable. 2/3 ounce is still plenty enjoyable. At weights at and above that you will start to feel the blank slow down.
For days I’ve been limited on rods or hiking in, it has even been used for twitching jigs and throwing floats. Typically, because my second rod is a fly setup so whatever my gear rod is quickly becomes a cookie cutter. The 3/4oz jigs definitely slow the rod down but distance is not an issue, accuracy is harder at the heavier weight. Obviously, it isn’t the typical blank for that use and such weight falls outside its intended range, but it works. I’ve also used a fixed float setup for small water steelhead fishing and no issues there. Beneficially you can throw lighter rigs with this rod, which is typical for summer season. At 7’8” you won’t be mending massive amounts of line, though for small water its just fine and/or especially when foliage is in the way.
The feel of this glass is addicting. After hooking into a couple summer steelhead it flexes deep but doesn’t fall over and keeps the fish pinned. All of that fiberglass goodness if felt as the fish tugs into the taper of the 710. On some of the water I frequent I have seen too heavy of line spook fish contrary to the adage that they aren’t line shy. With this I have no problem dropping down to a thinner line as the taper will protect a lighter offering. Look forward to using it for 4-8lb coho here come July on the saltwater. Will be buying another! Highly suggest giving this blank a go, along with a KR Concept guide train. The latter really compliments getting everything possible out of this 710.
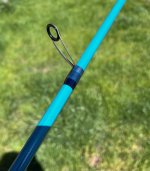
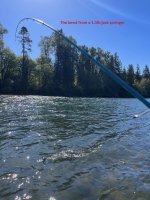
My first KR concept rod has taken me through quite the learning curve and I’d thought I’d share the steps I took along the way. I was lucky to have a great mentor in Les Cline, who helped with his vast array of knowledge guide me through the steps. The goal was to maximize casting distance/accuracy by providing optimal line control of which the KR Concept seems to do better than others. To read more I direct you to this resource.
Guide Selection
I started with the KR Concept Software to achieve a baseline starting point for this build. Knowing I would be throwing 15lb or 20lb braid I opted for a 16h-8h-5.5m reduction train setup, followed by a belly guide of a Fuji 5kb and seven Fuji 5kt running guides. That’s 11 guides + tip for a 7’8” rod. The software did short my running guides so I am glad I bought a couple extra.
Initial Setup
First, I spined the rod, and in this one piece NFC 710 I had a decent curve. Given this was a spinning rod I placed the curve up and put the guides on the opposite side, which when finished gave the rod a nice straight setup. I decided to make things easy for my testing and epoxied the grip and reel seat into position first, and glued the tip top in place. Then started with setting up the guides temporarily with masking tape in the calculator suggested intervals. Tape, orthodontic rubber bands or a fly tying bobbin can all be used to affix the guides temporarily.
Bullseye
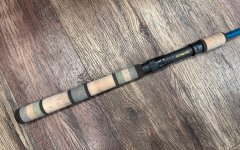
After getting the butt in place it was time to setup the rest of the reduction train. First I used the rule that your KB Belly guide is to be equal to the distance of your rod tip to first stripper 16h * .45 (or in the range of .42 to .45) from the butt guide. Then aligned the rest of my reduction train, (for me 8h and 5.5m) in a bullseye pattern as you look down the rod. One modification you can make is to space the KB guide slightly off-center of the bullseye further out on the rod if it still falls in the .42-.45 rule. This is suppose to help the line turn the corner into your runners. Your butt and belly guide are the two most important guides, so take your time.
So far the reduction train was in place and I then spaced the KT running guides out progressively from +5” from the belly guide to first runner to +3.5” from the last runner to tip top.
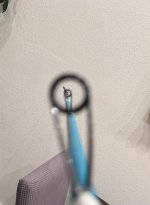
(It is fairly difficult to look down the guide train to find the KB belly guide. So I would place my finger on the KB while looking down the rod to easily identify which it is for alignment.)
First Test
I lined up my rod with lure (no hook) and the first test was for the reduction train. I focused on watching the coils coming off my reel and into the 16h guide. I played with moving the butt guide back and forth and that at 20.5” distance from spool tip to butt guide ring gave the best result. Coils were controlled quickly without slapping the blank and bunching wasn’t forming at the guide from being too close. In retrospect I probably would move this guide back another 1-1.5” towards the handle on my next build to help control the coils a little more mainly due to twitch jigging and the amount of slack line that needs to be controlled.
Runners
I then ran a two line static test to find optimal runner placement. For more info read this writeup by Tom Kirkman. You can move the KB guide within reason if needed to accommodate a guide as long as it generally falls in the .42-.45 rule. You can tweak this rule somewhat if needed to achieve a straight line from the reduction group to the belly.
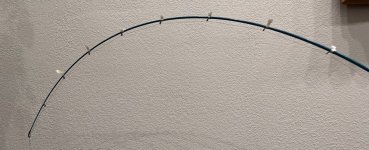
And my finished data for the APFG 710 + 6" extension:
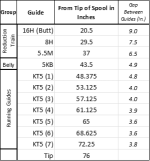
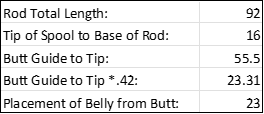
APFG710, NFC APFG710, APFG 710, FastGlass 710, AllPurposeFastGlass
All Purpose Fast Glass 710 Blank Review
After hearing good things about these lightweight Fast Glass offerings from NFC I wanted to try one out myself. Upon handling the 744 at the NFC facility I desired something with more of the fiberglass flex, feedback and feel given the fish I will be fighting are 4-8lbs with ~1/2oz lures. The 744 is a good jump in stiffness compared to the 742 and again from 742 to 710, of which the 710 felt awesome when I first gave it a wiggle. I added a 6” section as an oversleeve to help get more from the blank to total 7ft 8in. The rod doesn’t oscillate or bounce after a cast while providing plenty of flex and power. The goal was a blank that could throw 1/3 to 2/3oz spoons/spinners, targeting steelhead and coho (salt and freshwater), where distance will be a priority. And so far, the rod excels in this aspect! I can still feel the spoon wobble at 1/3 ounce and the blank really shines in the 1/3 to 1/2oz region. On a 2/5oz spoon, 140ft is easily doable. 2/3 ounce is still plenty enjoyable. At weights at and above that you will start to feel the blank slow down.
For days I’ve been limited on rods or hiking in, it has even been used for twitching jigs and throwing floats. Typically, because my second rod is a fly setup so whatever my gear rod is quickly becomes a cookie cutter. The 3/4oz jigs definitely slow the rod down but distance is not an issue, accuracy is harder at the heavier weight. Obviously, it isn’t the typical blank for that use and such weight falls outside its intended range, but it works. I’ve also used a fixed float setup for small water steelhead fishing and no issues there. Beneficially you can throw lighter rigs with this rod, which is typical for summer season. At 7’8” you won’t be mending massive amounts of line, though for small water its just fine and/or especially when foliage is in the way.
The feel of this glass is addicting. After hooking into a couple summer steelhead it flexes deep but doesn’t fall over and keeps the fish pinned. All of that fiberglass goodness if felt as the fish tugs into the taper of the 710. On some of the water I frequent I have seen too heavy of line spook fish contrary to the adage that they aren’t line shy. With this I have no problem dropping down to a thinner line as the taper will protect a lighter offering. Look forward to using it for 4-8lb coho here come July on the saltwater. Will be buying another! Highly suggest giving this blank a go, along with a KR Concept guide train. The latter really compliments getting everything possible out of this 710.
My first KR concept rod has taken me through quite the learning curve and I’d thought I’d share the steps I took along the way. I was lucky to have a great mentor in Les Cline, who helped with his vast array of knowledge guide me through the steps. The goal was to maximize casting distance/accuracy by providing optimal line control of which the KR Concept seems to do better than others. To read more I direct you to this resource.
Guide Selection
I started with the KR Concept Software to achieve a baseline starting point for this build. Knowing I would be throwing 15lb or 20lb braid I opted for a 16h-8h-5.5m reduction train setup, followed by a belly guide of a Fuji 5kb and seven Fuji 5kt running guides. That’s 11 guides + tip for a 7’8” rod. The software did short my running guides so I am glad I bought a couple extra.
Initial Setup
First, I spined the rod, and in this one piece NFC 710 I had a decent curve. Given this was a spinning rod I placed the curve up and put the guides on the opposite side, which when finished gave the rod a nice straight setup. I decided to make things easy for my testing and epoxied the grip and reel seat into position first, and glued the tip top in place. Then started with setting up the guides temporarily with masking tape in the calculator suggested intervals. Tape, orthodontic rubber bands or a fly tying bobbin can all be used to affix the guides temporarily.
Bullseye
After getting the butt in place it was time to setup the rest of the reduction train. First I used the rule that your KB Belly guide is to be equal to the distance of your rod tip to first stripper 16h * .45 (or in the range of .42 to .45) from the butt guide. Then aligned the rest of my reduction train, (for me 8h and 5.5m) in a bullseye pattern as you look down the rod. One modification you can make is to space the KB guide slightly off-center of the bullseye further out on the rod if it still falls in the .42-.45 rule. This is suppose to help the line turn the corner into your runners. Your butt and belly guide are the two most important guides, so take your time.
So far the reduction train was in place and I then spaced the KT running guides out progressively from +5” from the belly guide to first runner to +3.5” from the last runner to tip top.
(It is fairly difficult to look down the guide train to find the KB belly guide. So I would place my finger on the KB while looking down the rod to easily identify which it is for alignment.)
First Test
I lined up my rod with lure (no hook) and the first test was for the reduction train. I focused on watching the coils coming off my reel and into the 16h guide. I played with moving the butt guide back and forth and that at 20.5” distance from spool tip to butt guide ring gave the best result. Coils were controlled quickly without slapping the blank and bunching wasn’t forming at the guide from being too close. In retrospect I probably would move this guide back another 1-1.5” towards the handle on my next build to help control the coils a little more mainly due to twitch jigging and the amount of slack line that needs to be controlled.
Runners
I then ran a two line static test to find optimal runner placement. For more info read this writeup by Tom Kirkman. You can move the KB guide within reason if needed to accommodate a guide as long as it generally falls in the .42-.45 rule. You can tweak this rule somewhat if needed to achieve a straight line from the reduction group to the belly.
And my finished data for the APFG 710 + 6" extension:
APFG710, NFC APFG710, APFG 710, FastGlass 710, AllPurposeFastGlass
Last edited: