Winter projects?

Wetswinger

Go Deep
Forum Supporter
Finally finished two of my Winter projects. Finished and sold a NFC Iconoglass 8ft, 5#. This was a natural, white colored blank. It had an uploading, cork reel seat finished with grey tread and blue metallic trim bands.

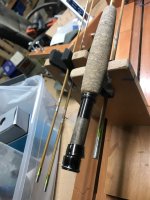
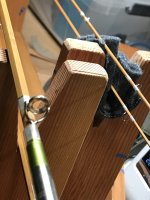
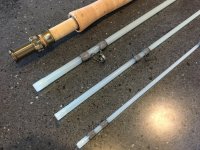
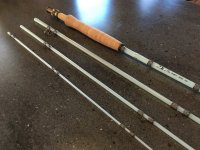
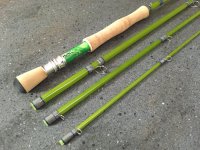
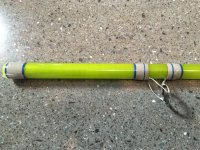
This latest, just finished yesterday, is an Iconoglass 8ft 6in, 8#. They only had a Teal colored blank available, so I bought it thinking I'd try using the Seahawks colors to finish it in. Proof Fly Supply is selling these custom built acrylic reel seats that are beautiful. Photos do them no justice, as they shimmer as you rotate them and have a 3-D visual effect.

I have one more rod left to build this year. Another Iconoglass 7ft, 4# in grey...
 

Attachments

  • IMG_1680.JPG
    IMG_1680.JPG
    660.4 KB · Views: 16
  • IMG_1681.JPG
    IMG_1681.JPG
    579.7 KB · Views: 16
  • IMG_1692.JPG
    IMG_1692.JPG
    587.1 KB · Views: 17
  • IMG_1699.JPG
    IMG_1699.JPG
    637.3 KB · Views: 17
  • IMG_1698.JPG
    IMG_1698.JPG
    658.4 KB · Views: 16

Kado

Steelhead
Ferrules epoxied. Not sure if even makes sense, but I always make my tip sections 1/8th inch shorter than butt and mid sections so they’re a little more protected. I used a pair of mini ferrules for the tip sections in the hopes it will lighten the swing weight. I did not hollow this rod to try and keep it as strong as possible.
 

Attachments

  • C3A02285-77D9-4D9A-96D1-4665A1F08FF1.jpeg
    C3A02285-77D9-4D9A-96D1-4665A1F08FF1.jpeg
    694 KB · Views: 12

Mike Monsos

Steelhead
Forum Supporter
I finished machining the #13 ferrule set last week and last night I used the station cutters to prep the shafts then epoxy them to the base and tip shafts. Early this morning was the first time the tip and base section were married up together. The shafts and ferrule mount look straight, the first wiggle of the assembled rod sections feels promising, motivating me to assemble all the components to mount on the shafts. Time to sort out the cork rings for my grip, select a reel seat spacer, machine a slip ring, cap and reel seat bushing and count out the guides that will be mounted. I'm hoping now that this is looking and feeling more like a fly rod now, I can pick up the pace and get this ready for some casting evaluation soon. Life is good (y)

Mike
 

Kado

Steelhead
I am envious you can machine your own ferrules. That is the most worrisome part of my supply chain...and most expensive, especially for a 3 piece rod with two tips.
Have you ever considered machining a reel?
 

Mike Monsos

Steelhead
Forum Supporter
To me, the lathe work is a cost reducer plus giving me the ability to make it my way. I looked at a tutorial on making a reel but decided that it is way above my skill level. I know just enough to be dangerous on a metal lathe :ROFLMAO:;)

When I first started making bamboo fly rods the hardware was a real cost consideration. Now that I have a metal lathe the costs are down but sometimes the frustration level is raised proportionally dealing with ferrule fitting. LOL.
 

Mike Monsos

Steelhead
Forum Supporter
Nice to get to the addons in this hobby. I should be turning down the cork to the reverse half wells grip I decided on tomorrow afternoon. After that I'll cut the reel seat side of the shaft to length.
sunday2.jpg


sunday.jpg
 

Attachments

  • sunday2.jpg
    sunday2.jpg
    150.3 KB · Views: 3

@Dryflyphotography

Life of the Party
Forum Supporter
I finished machining the #13 ferrule set last week and last night I used the station cutters to prep the shafts then epoxy them to the base and tip shafts. Early this morning was the first time the tip and base section were married up together. The shafts and ferrule mount look straight, the first wiggle of the assembled rod sections feels promising, motivating me to assemble all the components to mount on the shafts. Time to sort out the cork rings for my grip, select a reel seat spacer, machine a slip ring, cap and reel seat bushing and count out the guides that will be mounted. I'm hoping now that this is looking and feeling more like a fly rod now, I can pick up the pace and get this ready for some casting evaluation soon. Life is good (y)

Mike
Mike, to me what you are doing is pure magic, an alchemy within my favorite pastime of fly fishing. So very awesome!
 

Tim Cottage

Steelhead
Forum Supporter
None of it is rocket science but all of it takes attention to detail and the willingness to do whatever it takes to get the results you are willing to accept.
 

Mike Monsos

Steelhead
Forum Supporter
None of it is rocket science but all of it takes attention to detail and the willingness to do whatever it takes to get the results you are willing to accept.
And a little magic;)

Well the grip is shaped, shafts polished out, ferrules blued, guides located and waiting for wraps. From here on things will slow considerably adding the wraps, trim wraps and varnishing of the wraps. But the finish line is in sight:)
r2.jpg
r4.jpg
r5.jpg
r1.jpg
 

Mike Monsos

Steelhead
Forum Supporter
I use YLI 100 silk threads. Easy to find and lots of color choices. I avoid color preservers on my rods unless someone asks for it. In certain circumstances and colors, I think makes sense though.

I like to have a bit of transparency in my wraps. I'll stick to brown tones and tans and gold tones. I have a case of Highland Green that I keep thinking I'll use but it never seems to make it to the wrapping jig in time to get on a rod.

Mike
 

Mike Monsos

Steelhead
Forum Supporter
The wraps and trim wraps are on the base and the tip, the first coat of varnish applied to secure everything. Now it's just wait for the varnish to set up and add another coat and repeat until the wraps look right. Feeling pretty good now about this new "child";) (y)

Mike
 

Mike Monsos

Steelhead
Forum Supporter
I clean up the varnish run off of the wraps with UNWAXED dental floss while the rod is turning on the drying motor. You can double up a 12" length and run it up to the end edge of your wrap as the rod turns, you can move your tipping wrap tighter to the wrap if needed or just "scrub" the flats as they rotate up. if the floss gets sticky with varnish just pull a new section to use off the roll. Doing this will leave you a nice clean edge at the end of your wraps. The key is unwaxed dental floss.

Mike
 

Mike Monsos

Steelhead
Forum Supporter
I should have added that on my final varnish coat I leave a little run off to protect my two-thread trim wrap from getting knocked loose.

Mike
 
Top